

I was heavily into the bread maker culture in the 1990s and early 2000s, and experimented with a number of different bread makers. Around a year ago, I rediscovered several of the machines that I had stored in my basement, this rekindled my interest in the topic. Since that time, I have had the opportunity to work with other machines, including what is considered the top-of-the-line machine, a Zojirushi Virtuoso.
I have read blog posts and watched numerous videos where individuals rate various bread makers. Typically, they use a single simple recipe and then compare which machine produced the best bread. This methodology has flaws. Additionally, I watched videos where influencers do an unboxing and make a simple loaf, often gushing about the wonderful nature of the bread that they made. Sadly, I would consider some of those loaves dismal failures with poor rising or collapsed tops. These videos seem like ads to me. Lastly, there are a number of videos of bakers making wonderful loaves using a variety of machines from ancient 30 year old thrift store relics, to low cost machines, to top-of-the-line Zojirushi bread makers. This last group have unlocked the “code” of using their particular bread maker and illustrate that just about any working breadmaker can make a decent loaf of bread if the end users applies a bit of skill and knowedge.
Top-level bread machines offer durability, excellent construction, and flexibility, making them good choices for bread-making enthusiasts. However, those who just want homemade breads and yeasted products can produce wonderful loaves in most any machine if they use their critical thinking skills.
I have had failures with most of the machines that I have used, but I have also had successes. In this post, I want to share with you solutions to common bread maker failures and explore some options that go beyond those ideas that you may find elsewhere.

A nice loaf of bread that I made with the top-of-the-line Zojirushi Virtuoso.
This loaf was made in a Zojirushi Supreme model. Both the Virtuoso and the Supreme modes make similar loaves, but the Virtuoso offers a bit more flexibility if you are a bread-making enthusiast.

This is a loaf from a Breadman Ultimate purchased in the late 1990s. Looks good!
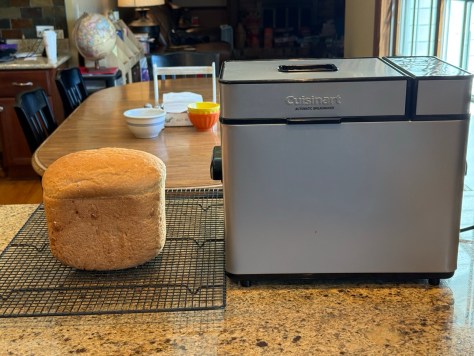
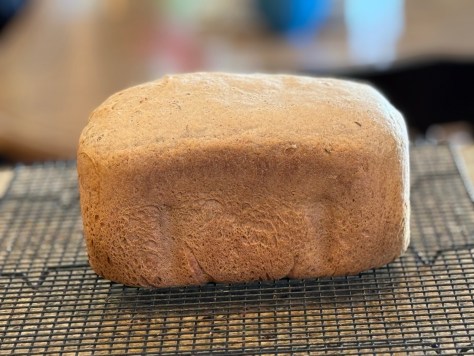
Another wonderful loaf, this one from a reconditioned $59 Cuisinart.

The beautiful loaves continue; this one was made in a sub-$100 KBS machine.
I placed the above photos to illustrate a point, and no, it is not to demonstrate my compulsive love of comparing things, although I suppose that trait is revealed. Be grateful that you are not my wife, as you don’t have to put up with my comparison hobby! I posted the photos to show that you can make a decent loaf of bread with just about any working bread machine. You just need to figure out its “secret” code. Why do I say this? Because bread machines are fairly simple devices that work very similarly. With that said, you may prefer one machine over another based on features, controls, or aesthetics. Whether you have a $10 thrifter or an uber-expensive top-of-the-line machine you should be able to get a decent loaf of bread out of it. Let’s take a look at their components.
Computer/Control System
All bread machines have a control panel that allows you to select a course or program for different types of bread, such as white bread or whole wheat. Some appear more complicated than others, but they all serve the same purpose and are generally easy to use once you become familiar with your particular gadget.
Motor/Kneading System
All bread makers have a motor that turns one or two paddles in the bread pan. This action kneads the dough.
Baking/Heating System
All bread makers have some type of heating element (s) that bakes the bread. Some may also be used to pre-warm the ingredients and/or keep the bread warm after baking.
As you can see, this is not a very complicated system, and after Panasonic released the first bread maker in 1986, many other manufacturers copied the design and added their own twists.
So far, I have told you that all bread makers can make a nice loaf, and that they are more similar than different. So, why is your loaf not picture-perfect? Dear reader, I can relate as I have had my share of disasters too. Despite being similar, every machine has its own quirks that need to be addressed. What works with one machine, or one recipe, may not work with another machine, or another recipe. Think of each machine as having its own personality. Once you figure it out your ability to communicate with the machine is dramatically improved.
The first discovery step is to make a standard loaf using the machine’s supplied recipe for white bread. Do your best, and then check the results. If you baked an excellent loaf, great! You are doing everything right. If not, let’s delve into a bit of chemistry.
A bit of chemistry
Breads are made with flour that has a high gluten content. Gluten is a protein that is created from other proteins when water is combined with the mechanical action of kneading the flour into bread. It is a stretchy, elastic compound that gives bread its chewy, yet airy quality. It allows the carbon dioxide made from yeast to remain trapped within the structure of the bread which causes the bread to rise.
Not enough gluten can be present if the flour has a low gluten content or if the bread was inadequately kneaded. This can result in a bread that is dense and flat. Conversely, over kneading can break down gluten and result in similar issues. This is one reason why bread machines have different programs for different types of bread as some flours, like whole wheat, need different kneading times.
Most bread makers suggest using bread flour, which has a higher gluten content. However, many will make an acceptable loaf with standard AP flour. If you want the best quality of bread, but you can’t get bread flour, you can use AP flour and add a couple of tablespoons of vital wheat gluten, which adds some additional gluten to the flour.

Yeast is a living organism that grows and multiplies when making bread. It utilizes sugars in the mixture to produce alcohol, carbon dioxide, and other compounds, which contribute to the lift and flavor of the bread. The alcohol is burned off, and the yeast is killed in the baking process.
Yeast comes in two dried forms, active and instant. Rapid and bread machine yeast is just rebranded instant yeast. Over the years, active and instant have become more similar; however, it is recommended to use the type specified by your machine’s manufacturer until you are very familiar with the machine.
Too much yeast will result in a rapid rise followed by a collapse of the bread. Too little will result in a poor rise and dense bread. Yeast goes bad, and sometimes this can happen even before you buy it. You can test yeast by adding some to warm water and a little sugar. It should start to foam after a few minutes. No foam? Then the yeast is bad. Yeast can also be on its way out, causing an inadequate rise. I always keep my yeast in the freezer and use it right out of the freeze when making bread.

Sugar is added for flavor and to provide food for the yeast. Not all bread recipes add extra sugar, as the yeast in the bread dough can break down the starch in the flour into simple sugars. Too much sugar leads to overproduction of yeast, while too little results in the opposite effect. Refer to the section above for the impact of over- and underproduction of yeast.
Salt is typically included in most bread recipes, as it adds flavor and helps control the yeast. Too little, and the yeast overgrows; too much, and it kills the yeast. All cooking salt is sodium chloride. However, salt substitutes are different and should not be substituted for traditional salt in a recipe.
Water is needed to obtain the right consistency of the bread dough and to help form the bread’s gluten. Too much, and the dough becomes slack, unable to contain the carbon dioxide bubbles, causing the bread to expand but then collapse during baking. Too little and the dough will be too solid and won’t expand adequately.
Other ingredients are often added to impact the flavor or texture of a loaf of bread. However, these can have a negative impact if used improperly. The bottom line is to follow an established recipe and only alter that recipe when you are wholly familiar with it. For instance, a recipe may use roasted garlic, but you might add fresh garlic instead and get a poor result. That is because fresh garlic can inhibit yeast growth, while roasted garlic won’t.
I like using recipes from proven and established sources, like the recipes that came with the bread maker, or well researched cookbooks from sources like Betty Crocker or Better Homes and Gardens. Once you are having success using these recipes you can venture out to other sources as you will have the skills to decipher bread problems. Remember, a random internet recipe may work well with one machine but not another. However, standardized recipes from known cookbook creators, like Betty Crocker, have been tested on a variety of machines.
The good news is that your bread machine has been carefully programmed to knead and bake your bread. If you combine your machine’s capabilities with a suitable recipe, you should achieve success. If you don’t, the problem may lie in one of your ingredients or perhaps your methodology.
Here are some issues
Ingredient issues
You now know how different ingredients impact your bread, so let’s start here. If you measured everything correctly, consider that one of your ingredients may be bad. The most likely culprit will be the yeast. If it is too old or you used the wrong type (active or instant) for your machine, then correct it.
Water issues
We have city water, which is chlorinated. That partially inhibited my yeast. I solved the problem simply by using the filtered water from my fridge. I could have also used bottled water, or left some water out for a few days, as the chlorine would evaporate away.
Measuring issues
This is a significant issue that can be easily resolved. It is imperative to measure properly. A little too much or too little salt or yeast can have disastrous consequences. Likewise, it is very easy to mis-measure flour. Scooping can result in 25% more flour than spooning it into a measuring cup. Not leveling the cup can also be a significant issue. Even if you measure properly, your flour amounts can be off due to the humidity in the air, as this can impact flour’s volume.
I avoid the above by weighing most of my ingredients. I have tested a variety of kitchen scales and most are “good enough” accurate. In other words, they are not perfect, but they good enough for baking needs. However, many have problems when measuring tiny amounts that are less than 10 grams. Therefore, I use a standardized set of measuring spoons and level them when adding small ingredients like salt and yeast.

I have tested a variety of scales, and none are “laboratory” accurate. This Oxo scale should read 500 grams using a standard weight, but it reads 498 grams instead. This is not an problem with larger quantity items, like flour and water, as the percent error is small. However, it can be a concern with low-volume ingredients like salt and yeast which is why I use standardized measuring spoons for items under 10 grams.
Many recipes in US cookbooks use volume measurements, but it is easy to convert these measurements to a metric weight system. For instance, a cup (8 ounces) of water is equal to 236 ml, and 236 ml of water weighs 236 grams. If I need a cup of water, I just need to place my baking pan on a food scale, tare the scale to zero, and then pour in 236 grams of water. If the amount is different, I’ll do some simple math. For instance, one and one half cups of water would be 236 x 1.5 = 354 grams of water.
Many ingredient packages list a volume to weight conversion for their item. I just made a loaf of oatmeal bread that had 1/2 cup of oatmeal as an ingredient. The oatmeal box notes that 1/2 cup of oatmeal is 40 grams by weight, so it is easy to tare the scale to zero and then add 40 grams. One fourth of a cup of oatmeal would be 40/2 =20 grams, and 1 cup of oatmeal would be 40 x 2= 80 grams.

If you can’t find the product’s weight on a package, you can do a simple search on Google. Additionally, baking sources, such as the King Arthur Flour website, offer volume-to-weight conversion tables for most ingredients.
Understand tricky ingredients
We already talked about the difference between active and instant yeast. However, other ingredients can also be tricky. Salt is a crystal that can be chunky (some Kosher salts) or present as a fine powder (table salt). If you use a volume measurement, the actual amount of salt that you add can vary greatly based on the size of the salt crystal, as finer salt packs denser than chunky salt.
Salt is inexpensive and the easiest solution is to buy and use the type of salt that the recipe recommends. If it says “Kosher” use that type, if the recipe just says “salt” the recipe is likely referring to table salt. As I stated above, many scales can be a bit iffy when weighing very small quantities so I prefer using measuring spoons for items like yeast and salt. If you have to substitute one type of salt for another you can google how to do this.

Here is a part of a salt conversion table from the Morton Salt website. You can see that one teaspoon of table salt is equivalent to 1 and 1/4 teaspoons of coarse Kosher salt, as table salt packs denser.
Salt can be hidden in other ingredients, which is why most recipes advise using unsalted butter. However, if you are only adding a couple of tablespoons of salted butter to a recipe, the amount of salt is fairly negligible.
Understand temperature
For yeast to thrive, the temperature has to be warm, but not too hot. Try to use room-temperature ingredients and warm liquids to “baby bottle” temperatures. Some bread machines have an ingredient warming feature, but many don’t. If your ingredients are too cold, the yeast won’t grow fast enough, and you will have a dense loaf. If it’s too warm, your yeast may over-grown, which can result in a collapsed loaf. If your ingredients are very hot, you will kill the yeast and bake a dense rock.
Check on your machine’s progress
Check your dough ball after 5-10 minutes of kneading for the best results. If needed, scrape down any unincorporated flour using a soft spatula (to avoid damaging the non-stick coating on the pan). Even if you measured properly, you may need to make minor adjustments to your dough ball. Add small amounts (one tablespoon at a time) of flour or water to correct dough ball issues. If the ball looks dry and ragged add a little water. If it is too slack, add a little flour. Wait at least 30 seconds before adding more of either to allow the dough to absorb the addition. The goal is to have a fairly smooth and slightly tacky ball that completely incorporates all of the dough.
It is OK to open the lid and check on the formation of the dough ball during most of the bread-making process. However, once baking has started, don’t open the lid, as doing so will alter your bake due to the temperature drop.
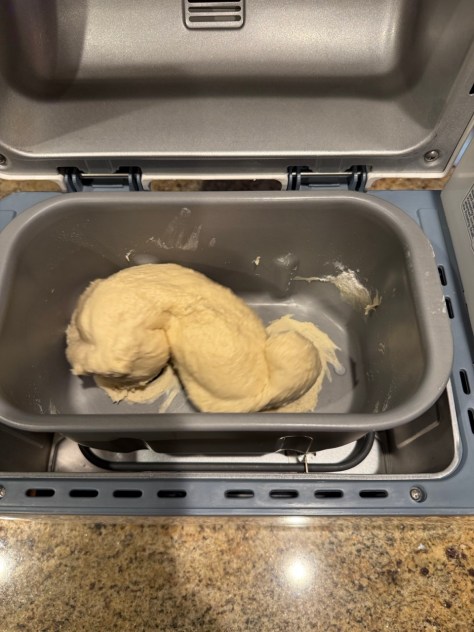
This dough looks slightly slack, as there is residual dough on the bottom of the pan. Add one tablespoon of flour and wait at least 30 seconds for the flour to incorporate. Repeat until you get a nice, smooth dough ball. If you measured everything correctly, the dough will need no correction or only minor adjustments to the flour or water.

This dough looks right. The dough ball is smooth, and it has cleared all the flour from the pan.
Room issues
If your room is very hot, very cold, or very humid your results may be poor. As much as possible, try to use your bread machine in a controlled environment. This isn’t a big issue in the US where many homes have sophisticated environmental controls, but it could be a problem if your baking environment doesn’t have these capabilities or if you are using your bread maker next to something like a HVAC vent that can make the micro-environment too hot or cold.
Once you are confident in your bread-making, try adjusting a recipe to suit your conditions. For instance, in a hot environment, you could consider using slightly less yeast, or in a very dry environment, you may want to slightly increase the amount of liquids.
Elevation issues
If you live in a high-elevation location, such as Denver, you may need to adjust your ingredients, as the lower air pressure can cause over-rising and a resultant collapse of your bread. Your bread machine manual will help you, but the typical suggestion is to make a slight reduction in the amount of yeast.
Magical additions
If you have done all of the above and are still experiencing problems, try some of these additional steps.
Please try using only one agent at a time; use multiple agents only when you have experience, as combining many additions can have a negative, rather than a positive, impact on your loaves.
Diastatic Malt
This name sounds a bit scary, but it isn’t. Diastatic malt is barley that has been sprouted, then slowly dried and ground into a flour. It is high in enzymes that break down the starch in flour into simple sugars that the yeast can use. This can result in a better rise, nicer crumb, and better flavor. Just use a little, less than 1 teaspoon, as too much can lead to gummy bread. I use around 1/2 teaspoon for a single loaf recipe when I use it.

Ascorbic Acid
Another scary-sounding “chemical?” Nah, this is just Vitamin C powder. You only need a tiny pinch of this stuff. Too much is not good. Vitamin C can help with gluten development, loaf volume, loaf color, speed up fermentation, and improve shelf life. You can also use a little lemon juice (one to two tablespoons), as part of your liquid volume, to accomplish a similar result. I only add the tip of a 1/8 teaspoon measure when I use this stuff.

Sodium Alginate
Derived from algae, a tiny amount of this ingredient can help gluten development, improve crumb, and extend the freshness of your bread. The amount to add is only one to two grams, which is around 1/2 teaspoon per loaf.

Dough Conditioners
These are combination products that combine some of the above agents with other ingredients to improve gluten, rise, color, and freshness. Their actual ingredients vary from brand to brand. I have been using a product called “Scratch,” which I picked randomly. However, it does a great job. I use around one teaspoon per loaf. I use this stuff fairly regularly.

Vital Wheat Gluten
This is a concentrated form of gluten that can be added to increase the gluten content of flours. Adding a couple of tablespoons can turn AP flour into bread flour or make whole wheat flour rise better.

If you follow the above suggestions, you will produce beautiful loaves of bread in the bread maker of your choice. As we face inflation and the Trump tariff taxes, we all need to be more aware of the cost of living. Making simple bread is cheap. Making a more elaborate bread is more cost-effective than buying a comparable store-bought bread. By the way, what could be better than adding a few ingredients into a pan, pressing a button, and being rewarded with delicious homemade bread?
Happy Baking!
Mike
Images are my own or downloaded from Amazon product pages for educational purposes only.