

In my last post, I wrote about creating a usable kitchen when lodging in a hotel. This post will be on a related topic: cooking in a car or van. I would also suggest that you read my previous hotel-cooking post as some of those ideas apply to vehicle cooking. However, there are enough differences to warrant a separate post.
In 2018 I bought a cargo van and started the process of converting it into a campervan. I have traveled all over the country in “Violet” and have slept in traditional campgrounds, National Park campgrounds, rest stops, BML land, on the side of rural roads, and in urban locations. Usually, I live in a “sticks and bricks” house; Violet is my retirement adventure vehicle.


Today I will be writing about individuals who live in non-RV-type vehicles. There is some fluidity between RVers and vehicle dwellers. However, RVs are built with fully functional kitchens, where other vehicles are not.
Skip my philosophical rant and go directly to the article by clicking this link.
Several different groups live in vehicles. Some Generation X and Z individuals live in converted vans to buck societal norms. They have rejected the astronomical cost of a college education and are seeking a different path, others shun a 40 hour/week rat race job. They want to live their lives on their terms, focusing on being in the now instead of waiting for retirement 50 years in the future.
Other van dwellers are adventurers whose passion for outdoor activities takes them to remote and sometimes primitive locations.
However, one of the most prominent groups of vehicle dwellers are those who do so because it is the only option available for them. There is an old line that the rich get richer and the poor get poorer. Unfortunately, that saying is more accurate today than it was a few decades ago. The disparity between the rich and poor is growing. Prices for essential commodities are inflating. The cost of food, rent, gas, and medical care is rising.
The last time the minimum wage was increased was in 2009, and it currently is only $7.25/hour. If you are working 40 hours a week and making minimum wage, your yearly income will be less than fifteen thousand dollars a year.
Ten million people survive on Social Security Disability in the US, with the vast majority of those individuals being adults. The average monthly payment for SSD is between $800 and $1800. I worked with many patients on SSD when I was a doctor, and most of them were getting around $800/month. That is $9600/year.
One in six US residents receive Social Security, that is about 64 million individuals. The Social Security Administration notes that Social Security is the primary source of income for most elderly. The average monthly payment for Social Security is around $1500, or approximately $18,000/year.
Forty percent of ALL Americans are one paycheck away from poverty (Prosperity Now). These individuals cannot deal with any significant unforeseen expense. In addition, those who make the least amount of money are often the most vulnerable to losing their jobs or having their hours cut.
Some suddenly find poverty because of a late-in-life divorce. These people are often women who may have had a low-paying part-time job during their marriage and now have to live on a minimal Social Security Check.
At this point, you may be saying that there are other resources for the poor. That may be true, but as a person who has worked with hundreds of individuals with low incomes, I can tell you that the reality is that additional help is minimal. Some can get food stamps, which average a bit over $100/mo. Even fewer can get subsidized housing. For instance, the average wait time for housing via the Chicago Housing Authority is 1-5 years. In addition, if you have a history of legal issues, you may be banned from this option. Charitable programs like food pantries, shelters, and “soup kitchens” are unreliable, limited, and often only in urban settings.
If you are fortunate to be financially solvent, it may be easy to blame the poor. You may want to scold them to “Get a better job” or “Go back and get an education.” However, in many cases, this is not practical. Those on disability can’t work a full-time job. Retired individuals on Social Security often can’t get work due to ageism, and when they find employment, the amount of income they make is low. With that said, I have known several individuals who worked a low-paying part-time job to try to make ends meet, and I can tell you that these jobs are frequently unstable.
It is easy to tell someone to go back to school, but not everyone can do this due to time, intellectual ability, or money. The scandal of online for-profit colleges illustrated this point. Their high tuition/high acceptance rates often placed poor and struggling individuals in worse economic straights. Imagine the scenario where a poor single mother tries to improve her financial position by attending an online university. Initially, she is drawn in by the idea that she will get a better job and pull herself out of poverty. The online university “helps” her secure unforgivable student loans, and she starts her classes. However, it is tough to work a 40-hour manual labor job, take care of a child, and run a household while attending classes. In addition, her substandard high school education has not prepared her well for the rigors of college work.
She struggles through two years of schooling before dropping out with nothing to show for her efforts but her unforgivable student loans, which could easily be $35,000 or more. This debt sets her back further as bill collectors garnish her meager salary. In addition, her damaged credit impacts many aspects of her life. It is now more challenging to buy a used car, rent an apartment, or get a better job.
By now, everyone knows that the middle class in the US is disappearing and that the gap between the poor and the rich is multiplying. The largest income growth segment in the US is for those earning in the top 5%, while the aggregate wealth of the poor has fallen from 7% in 1983 to only 4% in 2016 (Pew Research Center).
In the town that I live in, the cost of a typical one-bedroom apartment is well over $1000, and that does not include utility costs. In addition, most landlords require a security deposit plus the last month’s rent in advance. Also, many landlords do a credit check and will reject applicants with poor credit scores.
Of course, there are places in the US where rent is lower, but there are many places where the rent is much higher than where I live. Unfortunately, most jobs are located in high-rent locations. It is nearly impossible to rent an apartment in places like New York City, Seattle, or San Francisco without a good credit score and a good income.
Beyond the cost of housing, there have also been increases in other basic living costs. Electricity costs are estimated to increase by almost 3% this year. CNBC says that utility costs, in general, will increase by 10% this summer. If you have gone to the grocery store recently, you are aware that grocery prices are up. The national average increase is 2.6%, but it is often higher than that in many regions. A March 2021 article in “Forbes” notes that gasoline prices are currently high and that they are on the rise. The internet was once a luxury, but it has become a necessity. Like other utilities, the cost of the internet is going up (“Comcast is raising rates”-ARSTechnica).
The bottom line is that millions of individuals in the US live on extremely meager incomes, and it is nearly impossible for many of them to increase that income significantly. Additionally, millions of US citizens have no savings or emergency funds, leaving them utterly vulnerable if they have an unexpected expense or job loss. In addition, in many urban locations, it is impossible to afford housing on a low income. These factors make it extremely difficult for the poor and working poor to live an everyday life.
There have always been homeless people, and there have always been individuals who lived in their vehicles. However, with the advent of YouTube personalities like Bob Wells, there has been a greater acknowledgment that vehicle dwelling is an acceptable alternative to traditional “bricks and sticks” housing. With that said, there has also been an apparent backlash in communities that shout the mantra, “Not in my neighborhood.”
Cooking In A Vehicle
It is imperative for both health and financial reasons to be able to prepare food when you are living in a vehicle. Most can’t afford to go to a restaurant three times a day, and even fast food drive-thrus are expensive when used regularly.

Some are happy to exist on a diet of protein bars and trail mix. Other dwellers choose only to eat raw and unprocessed foods. However, both of these groups are in the minority. Most need a way to cook food in or outside their vehicles.
The more dedicated and permanent a kitchen space is, the easier and safer it is to use. If you cannot have a permanent kitchen space, you will need to re-create a safe area every time you cook. Don’t take shortcuts here, as to do so will result in eventual accidents or worse.
I like to think of dwelling vehicles in three general classes:
Van class.
This includes cargo vans and other larger habitats like box vans, cargo trailers, and school busses. Van class vehicles have adequate space to permanently install a kitchen, which can be configured in various ways. It is possible to create a fully functional kitchen when living in a van class vehicle.


Minivan class.
This group includes minivans, as well as some SUVs. Minivan class kitchens can be set up similarly to van class ones, but any build will be inherently smaller and more crowded due to the vehicle’s smaller size. A typical style is to build a small kitchen at the rear of the vehicle. These “hatchback” type kitchens are designed for outdoor cooking, but they often offer some accessibility inside the van. This dual functionality is essential, as it is not always practical to cook outdoors.
Sedan class.
Most passenger vehicles fall into this category, including sedans, hatchbacks, smaller SUVs, and compact cars. If you live in a sedan class vehicle, it is easiest and safest to cook outdoors. Some dwellers will set up an outdoor camping-style kitchen, while others will cook on a picnic table or tree stump.
There will be times when a sedan class dweller will need to prepare food in their car. If this is an occasional occurrence, they can probably get by with no-cook options, like sandwiches. However, there are situations where it is necessary to cook in a car regularly. I have seen clever mini-kitchens built-in sedan class vehicles, but these are the exception.
Most sedan class dwellers use the passenger seat, their bed, or the top of a cooler as their cooking zone. These options are potentially dangerous, and it is imperative to make these spaces as safe as possible. This can sometimes be accomplished using an electric cooking device, like a small rice cooker, instead of an open flame stove. However, many sedan dwellers chose to use small gas burners, like hiking-type stoves, as they are versatile and convenient. When cooking, it is essential to have a surface that is as level and fire-resistant as possible. For example, a metal cookie sheet can be placed on top of a cooler to provide fire and spill protection. It is crucial to minimize the clutter around the “kitchen.” Most sedan class dwellers will have to set up and tear down their kitchen every time they use it. There can be a tendency to become lax in this regard, but that could be a disastrous omission.

Inside or outside.
The more dedicated your cooking space, the easier it is to cook inside. However, cooking outdoors can offer advantages. It is safer, as you have more space, and you are surrounded by less combustible materials. In addition, grease and smells are left in the environment, not in your home on wheels. With that said, always cooking outdoors is not practical for many. There are times when the weather is too inclement and other times when you need to be stealthy. Therefore, even if you plan on cooking outdoors, you will need some sort of backup plan to prepare meals inside your vehicle.


Permanent vs. temporary kitchen.
I am a strong advocate of having a permanent space for your kitchen, but this may not be possible in all situations.
I have a permanent kitchen in my campervan, but I also carry a small countertop-style butane stove so I can cook outdoors when desired. For me, this is the best of both worlds.
Ventilation.
People worry about carbon monoxide poisoning, but this problem can be eliminated by cracking a few windows when cooking. Open flames consume oxygen, which also warrants ventilation.
Fire/spills.
A considerable risk when cooking in any vehicle is fire. Additional dangers include tipping over a boiling pot on yourself or melting parts of your car. You need to be extremely careful and vigilant when you cook in a vehicle. The smaller or more cluttered the space, the greater the inherent danger. Naturally, it would be best if you always had a fire extinguisher at the ready.
What you will need.
Your cooking style will determine your needs. As a rule of thumb, the most minimal setup will require something to heat food with, something to cook food in (which also can be used to eat out of), a cup or mug, a can opener, and some simple utensils, such as a spoon, fork, and sharp knife.
Common additions include plates and bowls, tongs, a pancake turner, a cutting board/mat, a strainer, hot pads/gloves, and possibly a small whisk. Specialty items like a corkscrew, a potato peeler, or a coffee system may be necessary for some. Others may want measuring cups, a potato masher, or a food thermometer. The options are up to you. I have items that I use all of the time (a pancake turner), and I have other things that I use very rarely (a potato peeler). I know that it would be sensible to dump the potato peeler, but I’m not ready to do so.

Some dwellers get by using a deep-sided fry pan to cook everything; others equip with both a saucepan (1-1 ½ quart is a good size) and a frying pan (8’-10″ is useful). Still, others have more elaborate cook kits that include several pots/pans and a kettle. If space is very tight, you may want to use a nested camping cookware system. However, I would avoid buying a cheap Boy Scout-style mess kit, as they are too small, too thin, and generally burn food.

Most vehicle dwellers use household pots and pans, as they are thicker and cook more evenly than camping gear. I always suggest using non-stick pots and pans when possible, as these are significantly easier to clean. Using a real plate and bowl can make van life seem more normal. Having service for one is OK, but service for two allows you to dine with a guest or use the extra items when preparing food.


Pro Tip:
I know that I just extolled the virtues of using a real plate and bowl, but I often find it more convenient to use paper ones when I’m vandwelling.
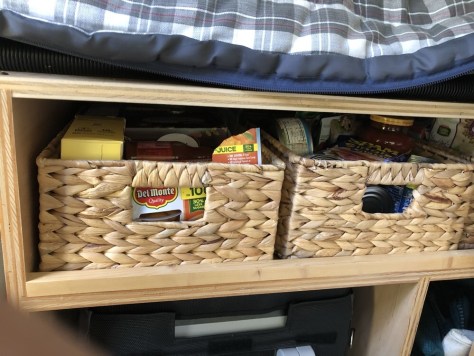
Storage and supplies.
It is a good idea to keep all of your cooking tools in bins for easy access. Likewise, most people keep their shelf-stable foods in one spot. Don’t forget that you will need some basic seasonings like salt and pepper. Many vehicle dwellers add a few more spices that fit their various tastes. Typical condiments include cinnamon, chili flakes, cumin, oregano, taco seasoning, and garlic/onion powders. Depending on the cooking you do, you may also need staple items like olive oil and flour. Grocery stores can be found everywhere, so don’t feel compelled to have a stockpiled kitchen immediately. Plastic bags from grocery purchases are perfect for your daily garbage.

Water.
The amount of water that you carry will be determined by your vehicle’s free space, as well as where you camp. Traveling in a van allows you to carry quite a bit of water while living in a car limits your quantities. Some folks camp in urban settings where it is easy to replenish their water supplies; others reside on remote BML sites and need to have enough water on hand for a week or more. Water can be carried in any food-safe waterproof container. Some use dedicated camping-style jugs, while others use gallon water containers from the grocer.


Food.
Most vehicle dwellers purchase and eat regular food, as dehydrated hiker’s meals are both expensive and (with repetition) bland. The choices are endless and determined by your eating preference, storage space, and ability to keep your food cold. There are many single-serving type foods at the grocer. Some popular items include Knorr Sides, Idahoan instant potatoes, tuna packets, and much more. Canned items like soups require no refrigeration, and hearty bread, like bagels, are crush-proof and stay fresh for a long time. I like to have a jar of peanut butter on hand, and I usually pack some quick-cooking pasta and oats. Since I have refrigeration, I usually have eggs, milk, cheese, butter, and yogurt on hand.


Where to buy groceries.
This may be an obvious section. Many van dwellers choose stores like Walmart, Aldi, and dollar stores as they offer the best bang for the buck. Some dwellers know when certain items get reduced, and that is when they shop. Remember, your storage space is limited, so you will need to buy food in amounts and sizes appropriate to that limitation. This may not always be the most cost-effective option.
Cooling and refrigeration.

It is perfectly possible to live full time in a vehicle and not have refrigeration. Many fresh fruits and vegetables don’t need refrigeration, and there are dehydrated, canned, boxed, and pouched items that are shelf-stable. In addition, it is wholly possible to buy something perishable as long as you consume it within a reasonable amount of time. However, having a way to keep things cold can be a game-changer and morale booster. Here are some excellent and not-so-good options.
Thermoelectric coolers.
These gadgets are relatively inexpensive and can cool and warm. Some truckers use them in their air-conditioned cabs. A thermoelectric cooler can cool to around 30F below the ambient temperature. If the temperature is 65F, the cooler will be at 35F. However, if the ambient temperature is at 80F, the lowest possible temperature of the cooler will be at an unsafe 50F. In addition, thermoelectric coolers are not very energy efficient. Most vehicle dwellers who try these devices quickly abandon them.

Standard ice chest.
These insulated boxes come in a variety of sizes and price points. You can buy a basic one for around $20 or spend over ten times that amount on a fancy Yeti cooler. In reviews the Yeti cooler often gets high marks for its ability to keep ice longer. I own one, and I would say that it is better than a cheap cooler, but certainly not ten times better. I don’t think that they are worth the money, and I would not recommend buying one. If you want a high-end cooler, consider one of the many Yeti copycats, as they often sell for 1/3rd the price of a Yeti.
Many who use a cooler quickly get tired of the expense and inconvenience of buying ice. However, a cooler can still function as a place to keep fragile foods fresh a bit longer. You can keep an ice-free cooler in a shaded part of your vehicle and further insulate it by packing your pillows and blankets around it. Delicate items, like bag salad, will stay fresher longer when stored this way.

Chest-style 12-volt compressor refrigerators.
Companies like Dometic have been making these fridges for years. They work great, and they are very power efficient. Unfortunately, they are also costly to buy, which places them out of reach for many. Luckily, there are now a variety of no-name Chinese 12-volt fridges available on places like Amazon. These units work well, but their reliability is unknown. You can buy one in a reasonable $200-400 range, making them somewhat affordable.


To operate a refrigerator, you will need some sort of house battery and a way to recharge that battery. There are many videos and blog posts on this topic. Every situation is different, so please take the following recommendation with a grain of salt. In general, you will need a house battery of around 100 Ah that is correctly connected to a solar panel that is at least 100 watts. Bob Wells says that 100 watts of solar is the minimum, 200 watts is ideal, and 300 watts is an abundance. I have 400 watts of solar on my van’s roof, and I have never had a lack of power.
Many vehicle dwellers have house battery systems to operate things like a fridge, a vent fan, and interior lights. Some build their systems, which can be more economical. Others use premade “Solar Generators.” These are boxes containing rechargeable batteries, a solar charge controller (which allows the batteries to be charged by solar panels), a DC to AC inverter, and 120v, 12v, and 5.5v (USB) outlets. Solar Generators come with an adapter, so you can also recharge the generator via regular mains power when available. Some will also slowly charge through the car’s cigarette lighter. Solar panels are not included and are an additional cost. Some panels are mountable on your vehicle’s roof; others fold up suitcase fashion and can be taken out of the car and placed in the sun when needed.


Ways to cook.
There are many ways to heat your food. I will list them by category.
Parlor trick cooking.
There are magazine articles that extol the virtue of cooking food on the car’s engine block. The instructions usually read like this: “Wrap chicken in heavy-duty foil and heat for 250 miles.” This is not a practical way to cook, and I can’t imagine eating something cooked in this fashion.
Open flame devices.
There are many ways to cook via an open flame.
Camping stoves.
The standard two-burner camp stove is a popular choice among van dwellers, as are single burner propane units. Both of these types of stoves use green 1 lb bottles of propane which are readily available. Propane tends to vaporize better in colder temperatures compared to butane, which may be necessary for some. In addition, it is possible to buy a hose adapter to connect your stove to a larger, refillable propane bottle (like the ones BBQ grills use). Using propane via one of these larger bottles is very economical.


Tabletop butane stoves.
These units have become very popular among vehicle dwellers because they are compact, have a stable base, and are very easy to set up. They are powered by butane which comes in an aerosol container that resembles a hairspray can. These units have excellent flame control, which allows for precision cooking. They are also inexpensive to buy. The downsides are that butane canisters are harder to find than propane ones (although that is changing), and butane canisters may be a bit more expensive to buy. Also, butane does not vaporize well in freezing temperatures.
It is possible to buy dual fuel stoves that can use butane or propane. Thereby having the best of both worlds.
When I have used a butane stove exclusively for all of my cooking needs, an 8 oz can of butane was enough for a 10-day solo adventure. I was only making simple foods like grilled cheese sandwiches and bacon and eggs during that time.

Backpacking type stoves.
These little stoves use small cans of iso-butane or a butane/propane mixture. They are designed for hikers, so their size is at a minimum. Many of them regulate their flames poorly. They are either off or running at full blast. They are especially good at heating water for dehydrated foods, but many hikers have figured out ways to cook full meals on them (check YouTube). Some stoves only cost a few dollars; others can cost over $100. The Jetboil system is a backpacking stove that is designed to boil water very quickly. Some vehicle dwellers keep one of these around for the sole purpose of rapidly boiling water for their morning coffee.

When assembled, backpacking stoves are taller than they are wide, making them more likely to tip. In addition, their pot support is weak, making it easier for a pot to fall over. Yet, these units are popular among sedan dwellers as they are small and compact.

Gel fuel stoves.
You can buy little stoves that burn gel fuels, like Sterno. They are slow to heat, but they do work. However, Sterno has gotten expensive, and there are better choices for van dwelling.

Spirit-type stoves.
These simple stoves use denatured alcohol or other spirits as their fuel. Hikers like them because they are tiny and lightweight. They work in colder temperatures, and it may be easier to find fuel as they can run on a variety of “spirits.” They cook more slowly than canister stoves. The combination of an open flame and a liquid fuel makes their use in a vehicle risky. Also, burning some types of fuel can be toxic, so superior ventilation is a must. If you are insistent on using one of these stoves, I would suggest a Trangia model 25 or 27, as they have a stable enclosed base.


Other stove types.
There are a few other stoves that campers use, but I would not recommend them for vehicle dwellers. Some stoves burn little fuel tablets, and others burn twigs. Both of these options are better for outdoor cooking and are not suitable for in-vehicle meal preparation.

Lastly, some van class dwellers have installed little wood stoves in their vehicles to provide both heat and a cooking surface. Naturally, you have to vent these stoves via an actual chimney on your roof. To use safely you would have to be highly conscientious. I would not recommend using one of these unless you were very skilled and knowledgeable in their use.
Cooking with electricity.
Yes, it is possible to cook with electricity, but to do so successfully you have to understand a little science. I promise that I’ll make this section understandable, so please don’t skip it as it is crucial.
There are two different systems that you can use when cooking with electricity in a vehicle. You can use a 12-volt DC system or use a 120-volt AC system-which is similar to the power system you use in your home. Cooking with electricity can be safer than cooking with an open flame. There is no carbon monoxide produced, and there is no open flame fire hazard. Cooking with electricity is even more appealing in tight/makeshift cooking situations, such as cooking in a sedan class dwelling.
12-volt cooking systems
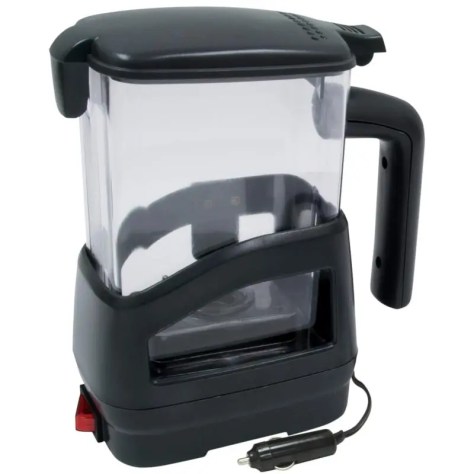
If you go to any truck stop, you will find a section in the store that sells 12-volt cooking appliances. These devices are varied and can range from 12-volt slow cookers to 12-volt mini frying pans. One popular appliance is the RoadPro lunchbox (144 watts). This lunchbox-style cooker is capable of reaching 300F, which allows not only cooking but also a little bit of browning/crisping. Another popular 12-volt appliance is the RoadPro 12-volt hot water kettle (100 watts). The kettle heats 20 oz of water very slowly to a boil (20-60 minutes). Since hot water is used to cook and rehydrate many foods, these kettles have some utility.


In general, 12-volt cooking appliances are small in capacity, slow to heat, relatively cheaply made, and have no adjustable temperature regulation. With that said, some of them, like the RoadPro lunchbox, have a devoted following, and the many types of foods that you can cook in the lunchbox are amazing. Cook times range from one to several hours.

12-volt cooking devices plug into the vehicle’s cigarette lighter, and because of this, they are limited to the number of watts that they can draw. Cars with a 10 amp cigarette lighter fuse can supply 120 watts, and vehicles that use a 15 amp fuse can provide 180 watts. As a comparison, many home small electric appliances use between 600-1800 watts of power.
These devices can drain your battery, and so they should only be used with the car running. It makes little sense to idle your car for two hours, so they are best used when driving from point A to point B. This is why they are popular with truckers who are always on the road.
Another gadget that many find useful is the Hot Logic Mini, which is a collapsable slow cooker. The Hot Logic comes in both a 120-volt and 12-volt version. It only draws 45 watts, but still, it should be used with the engine running. Like other low-wattage appliances, cook times run between one and several hours. The Mini can’t brown food, but it heats so gently that it can’t burn food. You can even cook a packaged meal directly in its cardboard box without the risk of fire.


You can also use 12-volt appliances with your house battery system. Most Solar Generators (battery boxes) have a 12-volt receptacle capable of powering one of these devices. You will need a moderately sized solar generator, as well as a way to recharge the solar generator’s battery (such as solar panels).
Let’s use the Mini and a 400-watt solar generator as an example. You could cook for about 8 hours before you would completely exhaust your battery (400 watts/45 watts = 8). Naturally, you don’t want to run your battery to zero, but you certainly can run the Mini for a couple of hours without much worry. The advantage of using your Solar Generator/house battery is that you can cook without running your car’s engine.
Pro Tip: in reality, when the car runs, the system voltage is increased to 13.6 volts (or beyond). Therefore, when a vehicle is running, a 10 amp fuse will support 136 watts, and a 15 amp fuse will support 204 watts of power draw before it blows.
120-volt cooking systems
It is possible to use some home-type small electrics in a vehicle carefully. Let’s look at a couple of options.
Powering 120-volt appliances using the car’s 12-volt system.
You can convert 12-volt DC power into 120-volt AC power by using a device called an inverter. These devices vary in price and quality. Lower-cost units are called modified sine wave inverters. These units approximate the cyclic nature of the 120-volt AC power that you use at home. More expensive inverters are called pure sine wave inverters. These units replicate the cycling that regular AC power has.
Modified sine wave inverters can be used for many things, and they usually work well with simple appliances (like a basic rice cooker) and gadgets. Most phone/computer chargers will tolerate power from a modified sine wave inverter. I have seen videos where a modified sine wave inverter was used to power a microwave. However, the oven was less efficient and ran hotter than if it had pure sine wave power. In addition, it took longer to heat foods.
The more precise that an appliance is, and the more computer controls that it has, the more likely you will need a pure sine wave inverter. For example, you will likely need a pure sine wave inverter if you power a medical device, like a CPAP machine.
DC to AC Inverters that can generate up to 400 watts of power are often supplied with a cigarette type 12-volt adapter to plug into your car. It is perfectly fine to plug them into your cigarette lighter, but you should only use them in this way if your appliance uses less than 200 watts of power.

If your power requirements are more significant, you will need to connect the inverter directly to the car’s battery terminals. Larger wattage inverters won’t include a cigarette lighter plug, as it is expected that you will connect those units directly to the battery.
When using an inverter connected to the car’s power system, it is essential to have the car’s engine running so that its alternator can replenish the power that you are removing. There are limits as to how much energy you can pull off, and it is possible to deaden your car’s battery even with the engine running if the load is too large or the run time is too great. Your car’s owner manual can give you more information on this, or you can ask your mechanic for their opinion as to your vehicle’s capacity. Also, old worn-out batteries are less tolerant of extra power loads.
When cooking using the car battery/inverter method, it is essential to use relatively low wattage appliances. One excellent choice is a basic 2-6 cup rice cooker. These units use from 200 to 400 watts of power, making it unlikely that they will deplete your battery if your engine is running. A rice cooker is an amazingly versatile device that can cook many things. It is relatively small, sits stably, and is relatively safe to use. To learn more about using a rice cooker in a car, search for the “Living In A Van” channel on YouTube.


Powering AC appliances using a house battery system.
Many vehicle dwellers have a house battery system to power fans, a fridge, and interior lights. If the system is large enough, it can also power small appliances.
Higher wattage home appliances can be adapted for vehicle use. However, these require a beefy solar-powered system with adequate solar panels and a powerful battery. My current system has 400 watts of solar panels. My Solar Generator has 1.7 kilowatts of lithium battery power and a 2000 watt pure sine wave inverter. With that said, careless use of my electric appliances would quickly deplete even this system. I try to cook large meals during the day (when my solar panels can charge my battery), and I tend to make quickly heated foods (like warming up soup) once the sun has gone down.

Pro Tip: high wattage demands deplete batteries faster than the same total draw at a lower wattage.
Pro Tip: a house battery can show quite a hit when using a high wattage appliance. However, part of that loss is artificial, and some of the power will return to the battery after 15 minutes of rest.
Here are some of the appliances that I use.
Induction Cooktop
I use an 1800 watt induction cooktop that is permanently mounted in my kitchen area. However, I never use it at a full1800 watts. I cook between 300 and 1000 watts. Additionally, my cooking times are short. I make grilled cheese sandwiches or eggs, or I’ll heat a can of soup. Induction cooktops are very efficient as most of the energy goes directly into heating the pan. They are significantly more efficient than a regular electric or gas cooktop.

Electric pressure cooker/Instant Pot
I am experimenting with a 3-quart electric pressure cooker. This unit uses 600 watts when pressurizing and much less energy when cooking (as the pressure has already been achieved). I recently made pork chops and sauerkraut in the cooker. I had to saute bacon and onions, brown four pork chops, and then the cooker had to take an enormous volume of food and bring it to pressure, after which it cooked for 14 minutes. The total operating time was almost an hour, and I used less than 22% of my battery power. I made the dinner for my family, but it would have lasted for four full meals if I were the only one eating. Using an electric pressure cooker is surprisingly efficient!


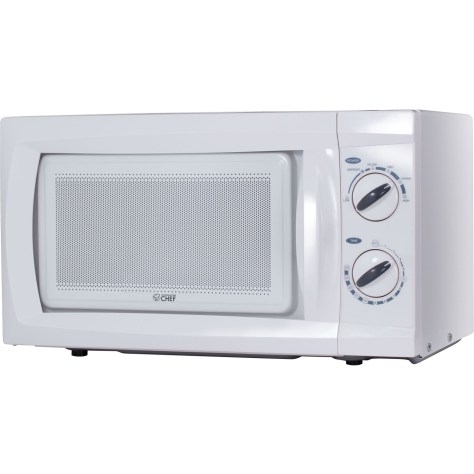
Microwave oven
I have a small 600-watt (output power) microwave oven that uses about 950 watts of input power. Lower wattage microwave ovens not only heat slower, but their energy conversion is less efficient than larger units. However, using a larger microwave would be impractical for several reasons in my small van. Even this inefficient microwave is pretty efficient, as I only use it for minutes a day to heat or reheat things. If I use it for 10 minutes a day, I am only consuming 158 watts of my house battery power (950watts/60 min x 10 min = 158 watts).
Although I don’t use them, it would be possible to run other small electrics with my system. However, I would always have to be cognizant of the amount of power that I’m using. Running any battery down to zero can shorten its life. In addition, I need to reserve battery power for other things like running my 12-volt fridge and fan, as well as charging my iPad and iPhone.
Some other small electrics that I could run on my house system would include a small electric coffee pot (550 watts), a basic 2-6 cup rice cooker (200-400 watts), and even a bullet-style blender (250 watts). It is not practical to use high wattage/long cook time items, like an air fryer, unless you have an enormously large house battery system.

It is all about the number of watts needed to operate the appliance and the time required to cook your food. All appliances will list the maximum wattage that they use on the back or bottom of their cases.
Let’s say you use a 100-watt appliance for an hour. You will have (roughly) used 100 watts of your house battery’s power. If you only cook something for half an hour in that appliance, then that same appliance will have consumed only 50 watts of your battery power. Naturally, these numbers are estimated as the conversion from your battery’s 12-volt DC system to 120-volt AC also requires some energy. However, using the above simple method will give you a rough idea of what you can use with your house system.
Pro Tip: Many modern appliances have computer boards and digital displays that use power even when the appliance is off. When possible, I use appliances with manual controls or unplug those with computerized controls when not in use.
Bonus Tip One.
It is possible to bake things when you live in a vehicle.
Naturally, you can use a Dutch Oven placed in a campfire’s coals, and many videos show you the proper ways to do this.
Some use their RoadPro lunchbox for baking, as it reaches 300F. You can find examples of people making biscuits, cookies, pizza, and cornbread in their RoadPro on YouTube.
You can also use the Dutch Oven method on a camp stove. When using this method, choose a deep pot with a lid. Isolate the bottom of your baking pan from the pot’s base by using a heat-proof trivet. Some cooks add a layer of clean sand or rocks in the bottom of the pan to even out the pot’s temperature. However, caution is advised as some rocks will explode when heated (they contain moisture), and some sand contains contaminants.
I have successfully used two different devices to bake with in my van. A Coleman collapsible oven and an Omnia stove-top oven. Both worked well. My van baking adventures were mainly for fun; I usually buy already baked items when traveling.


Bonus Tip Two.
It is possible to wash dishes without water. When living in-vehicle, water becomes a precious commodity. I use a modified method that Bob Wells and others have promoted. First, I prefer to use non-stick pots and pans as they are much easier to clean. While the pans are still warm, I wipe them out with a paper towel. I scrape off any burnt-on food with a nylon food scraper. When I have removed as much gunk as possible, I spray the pans with 100% white vinegar and then wipe the vinegar off with another paper towel. This method works very well. Also, I tend to use paper plates and bowls when possible as this cuts down on the amount of washing that I have to do.

Bonus Tip Three.
One way to conserve cooking fuel is to use the cozy method. This is useful for many foods that require water to rehydrate them. One example is Knorr Pasta Sides. Usually, you bring the packet’s contents and water to a boil, and then you simmer the mixture for around 7 minutes. Instead, you can bring the contents to a boil and then place the cooking pot in a cozy (insulated sleeve) to let the residual heat cook the food. Typically, you would increase the cooking time when using a cozy. If the instructions said to simmer for 7 minutes, I would leave it in the cozy for 10-15 minutes. You will need to do some experimenting to find the right time for your particular food. I made a cozy out of Reflectix and duct tape for a small camping pot that I have. It works great and cost almost nothing to make.


When I’m hiking, I like to make dehydrated meals that I portion out into Ziploc-style freezer bags. When it is time to eat, I boil water and pour it directly into the freezer bag, placed in an envelope-style cozy. After a stir, I let the mixture sit for about 10 minutes, and it is ready to eat. This not only saves fuel it also eliminates the need to clean up a dirty pot. I only use freezer bags as regular Ziploc bags can melt.
If you are a part-time van dweller you can use your home base to make homemade Mountain House-style meals. I also use a dehydrator to make shelf-stable foods that range from vegetables to spaghetti sauce.

Bonus Tip Four.
You can break the rules when making a packaged food. Let’s say the box says to add a tablespoon of butter. You can omit the butter and the food will still be edible. If you want to add some fat for flavor you can substitute a little shelf-stable cooking oil. Likewise, you can substitute water or water/powdered milk in instructions that call for milk. When making substitutions expect that the resulting product may not be quite as delicious as when made properly, but you can still eat it. Substituting is a great option when you are dwelling without refrigeration.
Conclusion.
I hope the above article illustrates that there are many ways to cook in your vehicle. It can be risky to cook in a confined space; the smaller the area, the greater the danger. You can minimize risks by using common sense. Set up a permanent kitchen or always create a temporary “kitchen” that is as fire-resistant as possible. Cook on a stable/level surface. Cooking with an open flame is possible but adds some additional danger. Ensure that you provide some ventilation when cooking with an open flame and keep a fire extinguisher handy. Cracking a window or two is usually sufficient when cooking. Avoid cooking with liquid fuels like alcohol unless you have a reliable, stable system (like a marine stove).
Cooking in a vehicle requires your complete attention. Don’t surf on your phone or do other distracting activities while cooking. When possible, cook outdoors as it is more pleasant to do so and safer. Your cooking area should be as clutter-free as possible; crowded spaces increase the chance of you knocking over things, including your cook system.
Cooking your meals expands your menu exponentially. There is a multitude of foods that can be inexpensively purchased and quickly made. It is wholly possible to have a varied and healthy meal plan even if you don’t have refrigeration. However, the addition of a 12-volt fridge can expand your culinary horizons to a level similar to those that you would have in a sticks and bricks dwelling.
Since I am a temporary van dweller, I tend to cook quick, simple foods. Grilled cheese, canned soup/stews, noodles, pancakes, bacon and eggs, and the like. However, permanent vehicle dwellers regularly make homemade stews, curries, and other more complicated meals. It is surprising to me to see how creative some cooks are. Individuals can make very elaborate meals using the simplest cooking systems. For real inspiration, search for “Backpacking Meals” or “Canteen Cup Tuesday” on YouTube.
If you are just starting in van life, try to use cooking tools that you already own. A small pot or pan from your kitchen will likely work better than an expensive titanium hiker’s pot. Also, a $20 butane stove will be more versatile than a $100 tiny backpacker’s system. You can easily add to or modify your kitchen as your needs change.
I would also suggest that you start your van cooking life by preparing uncomplicated foods. I find it easier to use premade items, like Knorr Pasta Sides, rather than creating elaborate sauces from scratch. In addition, par-cooked foods like Minute Rice rehydrate quickly and save you both time and fuel.

When I cook a more complicated meal, like a homemade soup, I like to make it in quantity to benefit from the fruits of my labor over several meals. I also try to minimize clean-up by washing items as I cook, using non-stick cookware, and dining on paper plates. You may choose to forego paper plates due to environmental reasons, but I find them a necessity.
Happy cooking
Mike