This is another in my series on saving money on groceries while improving your dining experience.
As inflation and the Trump tariff taxes continue to push up prices, it makes sense to find ways to stretch your food dollars. Making your own bread is not only less expensive than store-bought bread, but it also tastes better and can be customized to your needs. Like thicker or thinner slices? No problem., Sick of the outrageous prices of gluten-free bread? Make your own. Desire a specialty bread for a special meal? Absolutely!
My wife made a run to the grocery store and was happy that Ezekiel Bread had been restocked. However, she wasn’t pleased when she realized that a small loaf was now ten dollars. She didn’t buy the loaf.
Bread is the staple of life, and just about every culture has some form of bread. Bread is considered a subsistence food that provides the calories, vitamins, minerals, protein, and fiber necessary for life.
When I was growing up, my mother bought “Silvercup” bread, which was one step above “Wonder Bread.” It was good for sandwiches, but likely not the best in terms of nutrition. We also bought bread from our neighborhood bakery. What a difference that bread was. I have fond memories of walking into that place and being welcomed by the scent of freshly baked bread. I remember, with fascination, the clerk taking a fresh loaf, pushing it through a slicing machine, and then deftly shoving it into a waxed bag. That bread was the best.
My grandmother made most of her family’s bread, and it was delicious. She made a light rye bread that was baked into a large, round loaf. She didn’t buy yeast; instead, she would seed a new batch of dough with a portion of the dough she had saved from the week before. I can’t imagine that she measured anything; she just knew what to do after baking thousands of loaves of bread by hand. Making bread was part of her life, and I’m sure it occupied at least one whole day of her week.
My mom would make yeasted bakery, but I don’t recall her making bread. Most of her yeast bakes consisted of various filled coffee cakes, which we called kolaches, not to be confused with those delicious fruit-filled cookies called Kolacky.
I’m not sure exactly when I made my first loaf of bread, but I started to make it regularly during my residency. I was divorced at that time, and one of the few things that I took from that marriage was a large Cuisinart food processor, as my ex had no use for it.
I love machines, and the Cuisinart is one of them. I was determined to learn how to utilize every aspect of its capabilities, including its ability to knead bread dough. I read somewhere that a flour company had a recipe book for “cool rise bread,” and I tracked down their address, which was in another state. This was before the internet, so that task was more complicated than typing in a query in Google. I wrote them a letter..
A few weeks later, I received a nice note from the flour company, saying that they were surprised to hear from me, as their flour was not sold in the Chicago market. However, they sent me the booklet and wished me well. I adapted their recipes for my food processor.
Cool-rise recipes were ideal for me at that time, as I could quickly mix and knead the dough in the food processor, then drop the dough into a couple of bread pans that I placed in the refrigerator, where they would slowly rise. Eight to 48 hours later, I would bake the bread at my convenience. Having fresh bakery fresh bread as a poor medical resident was a tremendous morale booster. Typically, I ate generic white bread that tasted like sawdust.
When the bread machine craze hit in the 1990s, I bought a machine that made one-pound loaves. I upgraded to a machine that made 2-pound loaves sometime in the early 2000s, and I still have that machine today. However, I eventually stopped using my bread machine, and I’m not sure why.
This bread machine is over 20 years old, and it still works!
As my kids got older, I would make bread for them as a treat; soon, they were helping me in the process. By then, I had graduated to a Bosch Universal Mixer, a tremendous mixer that could make six loaves of 100% whole wheat bread at a time. It was great. However, the Bosch method still required work, and I no longer need six loaves of bread.
My Bosch Universal Mixer can easily make six loaves of 100% whole wheat bread.I rarely need this much bread now.The bread made in the Bosch is fantastic, but it still requires some work.
During the pandemic, I was cleaning my basement and rediscovered my bread machine. Would it even power up after sitting dormant for years? The answer was yes!.
I do most of the household’s cooking and make a lot of food from scratch. I cook many combination foods, such as soups, stews, and casseroles. These types of foods lend themselves well to a bread product, and I’ll often whip up something ranging from cornbread to a savory muffin. However, nothing has quite the allure of the smell of freshly baked bread.
Humans have been making some form of bread for over 14,000 years, and it is possible to make bread with the simplest methods and ingredients. Some people love the physicality of kneading dough, but I’m not one of them. However, I love the taste of homemade yeast products, and that is where my old bread machine comes to my rescue. I can toss in a few inexpensive ingredients, press a button, and a few hours later, I have a fantastic loaf of warm bread.
There are hundreds of bread recipes that can be made in a bread machine. White, rye, wheat, fruited, nutted, egg-enriched, sweet, savory, you name it. I made a nice white loaf today. What did it cost me for a 2-pound loaf of fresh, delicious bread? Around seventy-eight cents, including the cost of the electricity.
Bread machines are no longer trendy, so you can often get a used one at a second-hand store for almost nothing. Just make sure that the pan and paddle are included and that it powers up when plugged in. They are very durable, as mine is still running strong, despite being over 20 years old. Most electronic gadgets left in a basement for years would be out of commission. Mine is not an isolated case, as there are internet reports of others who are still using their bread machines decades after purchase.
In fact, I recently searched for bread machines on Facebook Marketplace and found many used models in the $10-25 range. You can’t even go to McDonald’s for that amount of cash. If you are interested, this is what to look for:
-Get a machine that makes between a 1.5 and 2-pound loaf
-Most prefer a traditional horizontal pan, but a vertical pan also works.
-Make sure that the unit comes with the baking pan AND the paddle.
-Make sure it powers up when plugged in.
-You can find recipes on the internet, and you can likely download your particular machine’s manual/recipe guide from the manufacturer’s website.
Many new bread machines sell for under $100, but top-of-the-line machines, such as those from Zojirushi, cost hundreds. Zojirushi is considered the best, but most will do fine with a less expensive brand.
Machines come with multiple programs to make different types of bread. Most users will use only three types: standard (white) bread, whole wheat, and dough. The dough setting is a great option, as the machine will do all of the hard work of making the dough, and all you have to do is form it for baking. The dough setting is terrific for making pizza dough, rolls, coffee cakes, and braided breads, where you make the dough in the machine but bake it in your regular oven.
Most bread machines come with various programs to bake different types of bread, such as white and whole wheat. The controls may appear complicated, but they are very easy to learn, and in most cases, all you need to do is press a button.
Some additional program settings may be included such as sweet breads, and gluten-free bread. If your bread maker doesn’t have a particular specialty setting you can try using the standard white bread setting. Additionally, some machines allow you to create programs where you determine each step of the bread making process. This last option is for advanced users who develop their own recipes or who use unique bread flours that require unusual mixing, kneading, and backing times. Will you use the cake, yogurt, or jam settings that your machine may have? Probably not, but that’s your choice.
Although many ingredients can be used to make bread, here are the basic ones and why they are necessary:
Flour – There are many types of flour, but for simplicity, let’s focus on white flour. Most bread machine recipes instruct you to use bread flour, a flour with a 15% gluten content. When your machine kneads dough, the gluten proteins are altered, becoming stretchy and more flexible. This results in a delicious, chewy, and spongy bread. All-purpose (AP) flour is a versatile flour suitable for a wide range of applications. It typically has a gluten content of 12-13% so bread made with AP flour won’t be quite as chewy or structurally sound as bread made from bread flour. In an ideal world, use bread flour for optimal results. You can simulate bread flour by adding a couple of tablespoons of Vital Wheat Gluten to AP flour to your bread ingredients, or just forgo the vital wheat gluten and still make a delicious breadmaker loaf using only AP flour. I often do that as I always have AP flour on hand. Lastly, cake flour contains only 7-9% gluten, as you don’t want a chewy cake; the low gluten content assures a tender result.
AP flour is inexpensive. This bag will make five one-pound loaves of bread. I often use AP flour because it’s in my household stock.Bread flour is also inexpensive, and it makes a better loaf. If you make bread regularly, consider buying and using bread flour.
Yeast-yeast is a living organism that feeds on the sugars and starches in bread dough and produces carbon dioxide gas, or CO2, as a byproduct. It is the CO2 gas bubbles that cause bread to rise. The yeast is killed in the baking process. Yeast comes in various types. Some bread machines use Active Dry Yeast, while others require Bread Machine Yeast, which is also called Instant Yeast. Instant Yeast granules are smaller and dissolve faster than the granules of Active Dry Yeast.
My bread machine uses Active Dry Yeast that I can buy in bulk at Costco. Each loaf uses only around ten cents’ worth of yeast.
Sugar-any form of sugar can be used, white sugar, brown sugar, honey, and molasses. Small amounts of sugar are added to help jump-start the yeast’s growth.
Any sugary product can be used for bead making, but most people have white sugar on hand. The recipe below uses around five cents of sugar.
Salt-salt adds flavor and also controls yeast growth. Never mix salt with the yeast when you add your ingredients; put them in a separate spot in the machine’s bread pan.
Water– is needed to bind all of the ingredients together. Naturally, other liquids, such as milk, are sometimes used to achieve a different type of loaf.
Other ingredients-.Eggs, dried fruits, spices, cheese, meats, different types of flours, nuts, butter, cooking oil, powdered milk, you name it. Each addition requires a slightly different recipe and may require different rising and baking times. The good news is that others have already figured out all of this. If you have a new machine, read the manual/recipe booklet. If you purchased a used breadmaker, download its manual, which will include recipes ranging from white bread to pizza dough, specifically created for your machine.
A simple and inexpensive white bread recipe.
*You must add ingredients into the baking pan in the order written.
-1.5 cups warm water
-2 T cooking oil
-1 and 3/4 t salt
-4 cups or 500 gms bread flour (or AP flour)
-2 T sugar
-2 ¼ tsp bread maker yeast (I use regular Active Dry Yeast with good results)
I weigh my flour for better results. Five hundred grams is equivalent to 4 cups of flour. Add ingredients in the order listed. I keep the salt and the yeast in separate spots, as salt can kill yeast if it is too concentrated.Just press a button and the machine will mix and knead the dough in several cycles before baking it. A perfect loaf!Use a serrated bread knife when cutting soft breads. The knife on the top is a food service knife, and it wasn’t very expensive. Its slightly longer length works well to make short work out of making slices. Nothing is quite as wonderful as fresh, warm, crusty homemade bread!
Use your bread maker’s “normal” or “white loaf” setting. Mine makes a great loaf of white bread in 3.5 hours. Total cost of the loaf, including electricity? $0.78!
Allow the bread to cool at least 30 minutes before cutting. A serrated knife works best. Any will do, but I like a knife that is a bit longer. It is not necessary to buy an expensive serrated knife, as they are no different from a less expensive one. Serrated knives don’t cut the bread; they tear into it. I have also used a standard Chef’s knife. If it is sharp enough, it will slice bread.
Remember, that homemade bread has no preservatives or other agents to keep it looking fresh. If you don’t consume it in a couple of days, freeze it. You can purchase inexpensive bread bags on Amazon, as well as other types of containers, to store unused bread. If we have any left after a meal, we usually use a large Ziploc-style bag, as we have those on hand.
Homemade bread machine bread is delicious and almost effortless to make. Having a homemade slice of bread with dinner elevates the experience, and a lunch sandwich made with homemade bread is superior to any packaged product. If you see a machine at a thrift store, give it a try. If you want to buy new, there are many machines available in the sub-$100 range. Happy bread making!
Mike
Images are my own or screenshots used only for educational purposes.
Food prices have been rising significantly and are expected to continue increasing with the new tariff taxes that we are all now paying. Since everything, from the aluminum in a soda can to the tomatoes on our salads, is imported, it is expected that the prices of most foods will increase further over time. Even US-sourced foods are skyrocketing in price. I was recently at the grocery store and spotted a beef brisket being sold for an astounding $75! I always thought of brisket as a tough, cheap cut of meat, but along with ribs and chicken wings, what was once cheap is now expensive.
Seventy-five dollars for a beef brisket!
I was on a road trip with my wife. We stopped for breakfast at McDonald’s. I got a breakfast meal, she got an Egg McMuffin, coffee, and a soda, and our bill was almost $20. Eating at McDonald’s was always a cheap way to feed my family when we didn’t want to cook. My kids eat less conservatively than Julie or me. If we were traveling as a family, a breakfast at McDonald’s could now cost us $60 to $70. I’m starting to think of Fast Food as a luxury option!
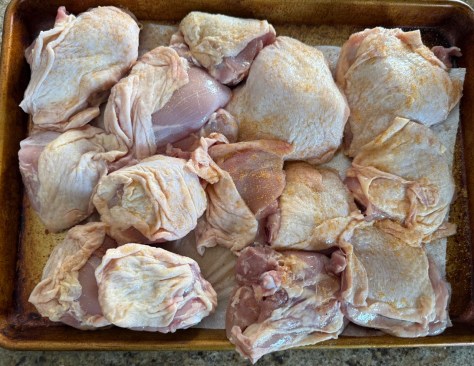
Groceries have become expensive, but it is still more cost-effective to cook at home. Chicken thighs are relatively inexpensive, especially when you buy them in bulk. I’ll often purchase them at Costco, as they are already portioned into smaller packs that are suitable for freezing. If I find a reasonable price elsewhere, I separate the chicken into meal-sized portions and freeze them using my vacuum sealer.
A vacuum sealer is the unsung hero of food preservation. Vacuum sealers can be a relatively inexpensive purchase and can dramatically reduce your food waste. I’ll separate meats into meal-sized portions, label the vacuum bags with the type of meat and the date, and then freeze them. This prevents waste from freezer burn.
If we only use part of a package of bacon, I’ll vacuum-seal the rest and store it in the refrigerator. Vacuum-sealed bacon will stay fresh much longer. I’ll do the same with a cut avocado to prevent it from turning brown.
Individual portions of a casserole or soup can be vacuum sealed and frozen. Need a quick lunch? You can reheat the food by the “boil in bag” method, or by venting and microwaving.
Being creative, you can extend the lives of many foods by vacuum sealing. A vacuum-sealed chunk of cheese won’t dry out and will stay mold-free. Strawberries (using a vacuum jar or a Mason Jar sealed with a vacuum-seal jar attachment) will stay fuzz-free much longer in the fridge. Fresh meats will also remain good longer in the refrigerator if vacuum sealed first. Sometimes, I’ll find meat on sale and I’ll keep it in the fridge to cook the next day. Life happens, and plans change. If I have to delay cooking, I’ll vacuum-seal the refrigerated meat to extend its shelf life longer.
The most significant expense associated with using a vacuum sealer is the cost of the bags. Brand-name bags are great, but they are expensive. However, you can find acceptable and much cheaper off-brand alternatives when buying in bulk on Amazon and other sites.
I typically use a different type of vacuum sealer, known as a chamber vacuum sealer. This type creates a stronger vacuum and easily handles liquid contents. Traditional external vacuum sealers require special techniques when sealing liquids. Another significant advantage of using a chamber vacuum sealer is the lower cost of the bags, which is comparable to that of a Ziploc bag. Again, buying them in bulk is the key.
You can get a decent traditional external vacuum sealer for under $100, with many costing under $60. Chamber sealers used to cost well over $1,000, but Chinese-made versions hit the market a few years ago, and I have seen chamber sealers in the sub-$300 range. The brand-named $1,000 sealers were designed for semi-professional use and were intended to last a consumer a lifetime. I can’t verify the longevity of the no-brand units, but they would likely last well enough for a homeowner if properly maintained. I have tried a few of them, and they seal just as well as the brand-named products.
I made this little video for a friend who was beginning to use a vacuum sealer. However, you might find it helpful as well.
Baked chicken is delicious, but can be boring if served too often. There are thousands of recipes that use chicken as an ingredient, stretching this meat while creating a delightful end result. Today’s recipe is for Chicken Paprikash, featuring chicken thighs in a creamy paprika sauce. Due to the richness of the dish, one decent-sized chicken thigh served over noodles is usually enough for most of my family members, with my son occasionally opting for two. You can substitute other chicken parts if you wish. Chicken legs are even less expensive than chicken thighs. I’m guessing that two good-sized legs would constitute a portion for a typical eater.
I use an electric pressure cooker (similar to an Instant Pot) to speed up my cooking process. However, you can also prepare the same recipe in a heavy pot/Dutch oven or even a heavy, high-sided frying pan with a lid. This dish can be prepared on the stovetop or by starting on the stovetop and then finishing it in the oven. There are also recipes for paprikash that can be made in a slow cooker. If you choose a different method, just Google for recipe times. For instance, “recipe for Chicken Paprikash in a Dutch oven.” Many of the recipes will be similar, but the times and possible amounts of liquids may vary. If you are using a manual stove-top pressure cooker (which operates at a higher pressure), you can reduce the pressure cooking time slightly (13 minutes instead of 15 minutes under pressure).
Chicken Paprikash Made In An Instant Pot- Electric Pressure Cooker.
Ingredients
-Oil
-3-4 pounds chicken thighs
-salt and pepper
-1 large onion chopped
-heaping teaspoon jar garlic
-¼ cup paprika
-1 heaping tablespoon tomato paste
-12 oz chicken broth, or water with a broth substitute like “Better Than Bullion.”
-1 cup sour cream
-½ cup half-and-half or heavy cream (optional)
Season the chicken with salt and pepper. Set the pressure cooker to “sear” and add a small amount of oil. Lightly brown the chicken in batches, avoiding overcrowding, as this will cause the chicken to steam instead of brown.
Remove the chicken and add new chicken pieces to brown until the job is completed. Set aside the browned chicken for now.
Add the chopped onion and let it soften in the pressure cooker (the cooker is still on sear/sauté). When soft, add the garlic and stir for around 30 seconds. Then add the paprika and lightly cook it to bring out its flavor. Avoid burning the paprika. Add the tomato paste. After around 20 seconds, add the broth to the mix and stir everything together.
Return the chicken to the pot and pressure cook on high for 15 minutes. Let the chicken “rest” for 10 minutes after cooking is done before releasing the pressure. This will keep the chicken juicy.
Remove the chicken to a serving platter. Put the sour cream in a bowl and add around ½ cup of the broth from the pressure cooker, stirring until everything is incorporated. Then mix this into the broth in the pot.
Optional: I sometimes add ½ cup of half-and-half or heavy cream if I have it on hand.
If you prefer a thicker sauce, mix a heaping tablespoon or two of cornstarch with around two tablespoons of cold water, then stream/mix this mixture into your boiling broth.
Adjust the salt and pepper to your taste in the sauce and pour it over the chicken.
Serve on a starch of your choice. Noodles work well. I had some dried spätzle that I cooked up.
A biscuit, bread, or muffin can complement the meal, making your dinner hearty and satisfying.
My measurements are approximate as I cook by feel. With many recipes, a slight variance doesn’t make much of a difference in the end product. For instance, using ¾ cup or 1 1/4 cups of sour cream will both yield a delicious paprikash. When you are starting your cooking journey, the most essential ingredients to measure are the spices (including salt), as too much can ruin a dish. Baking tends to require more exact measurements, but even with baking, some variance is allowed.
Chicken Paprikash utilizes many common food staples and doesn’t require exotic ingredients. Pat the chicken dry to reduce spattering when browning. I used some seasoned salt, but salt and pepper work too. Brown the chicken in batches, avoiding overcrowding.Sauté the onions in the electric pressure cooker until they soften, then add the garlic. Adding the garlic too early will cause it to burn.Add the paprika and cook it gently, avoiding burning. Add the tomato paste. Add the broth and mix until everything is combined.Return the chicken to the pot, secure the lid, and pressure cook for 15 minutes. After the cooking time is done, allow the chicken to rest in the cooker for 10 minutes before releasing the steam. In a pinch, you can release the steam immediately, but that may result in slightly drier chicken. Mix some of the hot liquid from the pressure cooker into the sour cream until smooth. Then pour this mixture back into the pressure cooker, which is once again set to “sear/brown.”With the pressure cooker still set to “sear/brown,” adjust the salt/pepper levels to your liking. Add salt only a little at a time (around 1/2 teaspoon), tasting in between each addition. You can always add salt, but you can’t remove it. If you want to add a thickener, such as cornstarch, the liquid must be boiling. 1-2 heaping tablespoons of cornstarch dissolved in approximately two tablespoons of cold water should suffice. Add this in a stream while stirring, and your sauce should thicken in a minute or two.Pour the sauce over the chicken to complete the dish. Reserve additional sauce to be added over the noodles. Served over some noodles, accompanied by a biscuit to complete the meal. Very filling and delicious!
The advantage of writing a non-commercial blog is that I can write whatever strikes my fancy. Often, this is based on what has caught my interest in the news or an article I’ve read, or sometimes something in my personal life.
Most recently, I have been struck by the runaway inflation that impacts every aspect of our lives, from purchases to repairs. Many of these costs are unavoidable, with few opportunities for cost reduction. However, I have been trying to exercise some options by doing things that I have never done before. For instance, I’m now negotiating for a lower price for a simple home repair. My plan is to do this reasonably, where both parties benefit. I receive a small discount, and the repair person gets the job. Additionally, I’ll call several shops when I need a car repair, such as replacing my brake pads. In the past, I would use my local dealership as it was convenient. Now, I’m willing to drive to a more distant shop and wait, which can result in hundreds of dollars of savings.
My parents raised five kids on a single salary. Naturally, the times and expectations were different in those days. Things were repaired instead of replaced, and we had only one car, which was typically used. I had few clothes; when I attended a Catholic grade school (grades 1-8), I wore a school “uniform” and had two pairs of navy blue pants and two light blue shirts. During the majority of my freshman year at a public high school, I had one pair of pants. I thought no one noticed until I got a second pair around three-quarters of the way through the school year. My lab partner remarked, “OMG, you have a second pair of pants!” He quickly realized what he had said and tried to retract his statement. I was embarrassed, but we went on with our lesson.
I knew money was an issue at home, but I never felt that we were in danger of not getting our true needs met. Food was always plentiful, thanks to my father’s passion for food and my mother’s expertise in stretching a food budget. My mom was a great cook, and my friends often wanted to eat at our house. Now, looking back, she was able to turn simple ingredients into marvelous meals. Much of this was achieved by cooking foods from scratch and occasionally using convenience foods, such as canned condensed soups, as an ingredient base, to expedite her meal-making process. I learned by watching.
I have had periods where I was objectively penniless. The eight years that I spent in medical school and residency were times of sacrifice. My first marriage ended while I was in medical school. By the time I started my residency, I was living in my own apartment, paying child support, and trying to live as frugally as possible. I was so poor that I survived on the change in my pocket, and I had to take drastic measures for even the most rudimentary tasks, such as buying and preparing food. I rarely ate in the hospital’s subsidized cafeteria as I found it too expensive.
I had roughly $20 for my weekly food budget (approximately $58 in 2025 money), so money was tight. In those days, grocery stores had “generic aisles” that featured basic foods with stenciled labels, such as “Green Beans” and “Flour.” This food was not on par with house brands; it was significantly lower quality. Additionally, I would search for (then) low-cost meats like turkey legs, hamburger with TVP added, and generic baloney, which was certainly something other than real baloney. I would often make enough food for two meals, and before eating, I would separate half of the food into a Rubbermaid container. That container would be my lunch for the next day. My system worked surprisingly well, and I believe that my lunches were often better than those of my richer colleagues, who were buying from the cafeteria.
Part of my ability to utilize my cooking system was my ease of cooking. I believe that this was due to learning by watching my mom cook, as well as my opinion that cooking was simply a matter of practical chemistry. Different methods often shared common roots. If I understood fermentation when making bread, I could apply that knowledge to other processes, such as making yogurt.
When Julie returned to the paid workforce, I took over a lot of the meal prep, but I did it with a twist. My kids became my co-participants, and we all worked on all aspects of food, from shopping to meal preparation to cleanup. I wanted to instill these fundamental skills in them, and I wanted those skills to become second nature.
Now that my kids are living independently, I hear them talk about shopping “the sales” and preparing food from scratch. My one daughter is in the habit of preparing recipes for a typical family of four, dividing that meal into four storage containers and feeding herself for four days on that initial preparation. She is a busy professional who enjoys spending time with her friends and engaging in activities. She doesn’t want to spend all of her time in the kitchen and realizes the cost issues of always eating out.
I have been retired for several years, but it is not uncommon for me to cook for groups of 3 to 6 adults. I have done my best to save for my senior years; when you retire, you spend money, but you don’t make money. I still cook many meals from scratch and use only a limited amount of prepared foods in my cooking. I’m not adverse to using some processed foods, and on occasion, I’ll make a frozen meal, but that is not the majority of the time, as those meals are of lower quality and much more expensive than what I can make myself.
I wanted to share some of the simple recipes that I use to take some of the mystery out of cooking. With a bit of practice and some basic tools, almost any type of meal prep is possible. This will be a random series that I add as my mood dictates.
Today’s recipe is:
Chicken Carcass Soup
I know that sounds horrific, so you can call it (depending on how you make it) “Chicken Soup” or “Cream of Chicken Soup.”
The Costco $5 roasted chicken is a bargain in terms of both convenience and cost. Additionally, it is delicious. I’m able to feed my family dinner with a chicken, but there is usually quite a bit of fragmented meat left on the bone. I developed this simple recipe to salvage this meat, and it has become a family favorite. I usually make the creamed version, but you can opt for basic chicken soup if you prefer. The recipe is very flexible; beyond some basic ingredients, you can be as creative as you wish.
-Refrigerate the chicken carcass with the remaining meat until used. I prepare the soup within a few days of eating the roasted chicken. You can also use your own roasted chicken carcass (not Costco) or just a cut-up fresh chicken. If you do the latter you can add the chicken to the pot as is or brown it first. Browning will add more flavor. I think the skin adds flavor, but you can use skinless if you prefer. Remember, pre-cut chicken is more expensive than a whole chicken. A carcass will yield a soup that is inexpensive to make. A boneless, skinless chicken pack will be more expensive and won’t taste as good.
-If using a carcass, remember that chicken is already thoroughly cooked, but you want to cook the vegetables. You can simmer the soup for an extended period to achieve a richer/deeper flavor.
-I often use a pressure cooker at high pressure for 15-20 minutes (quick release), but you can also use a big pot or Dutch oven. If you are using a pot, bring the contents to a boil and then immediately turn down the heat to a simmer. Cover the pot and cook for around 30 minutes or longer (slow simmer) for a richer flavor. A slow cooker also works for around 4 hours on high or 7-8 hours on low.
-To make the basic chicken soup, I’ll use (very roughly) ½ of a chopped onion, anywhere from 2-4 stalks of sliced celery, around 3-6 cut-up carrots, and some salt and pepper. The vegetables can be a bit past their prime. In a pinch, I have used dried celery and even dried onions, but they are not quite as good. If I’m feeling ambitious, I’ll slightly char the onion, which adds flavor and depth. I’ll always add a broth extender, usually “Better Than Bullion,” but in a pinch, a few bullion cubes also work. I’ll add anywhere between ½ to 1 teaspoon of salt and a similar amount of black pepper. I am always very sparing with salt, as bouillon contains a lot of it, as does the chicken. I adjust the salt after the soup is cooked. I’ll add water to cover the solids, about two-thirds of the way up the carcass. You need enough water to cook the bones and vegetables. However, too much will make a diluted soup. You can always add water at the end of the cooking process if your broth is too concentrated.
-You can add all sorts of additional vegetables if you wish. Add some chopped, overripe tomatoes (not moldy, of course), or a can of tomatoes. Add fresh, frozen, or canned peas, corn, green beans, carrots, or any other vegetable of your choice. If using canned vegetables, drain and add them at the end of the cooking process. However, avoid strong vegetables like broccoli or cauliflower. Some soups do use strong vegetables, such as cabbage, and those soups can be delicious. However, chicken soup is not one of them.
-If all you have is salt and pepper, that is fine. But to add additional depth and interest to the soup, it is easy to add some spices. You can add some or all of these, depending on what is in your spice cabinet. I usually add ½ tsp to a scant teaspoon of each spice. Here are some dried herbs that I add: oregano, basil, parsley, 1-2 bay leaves, and thyme. I’ll also add a little MSG. By the way, all of that stuff about MSG causing medical issues has been disproven. Lastly, I add around one heaping teaspoon of jar garlic, because I love garlic.
-I’ll often break the carcass in half (or more) to easily fit into the pot. Sometimes, I’ll use a trick from my sister-in-law and wrap the carcass in cheesecloth, which makes bone removal easy. Otherwise, I’ll just “tough it out” and use a colander to separate the solids from the liquids. Using my hands, I’ll pick the meat off the bones, discarding the bones, and then return the rest to the pot for “stage two.” I’ll let the soup cool down a bit before removing any bones manually.
-I always add a starch, which can be anything I have on hand. You can cook the starch in the broth or make it separately. Both work, but you have better control and a better product if you make the starch separately. What starch? Anything. Any type of pasta, including noodles and even spaghetti. Potatoes cut into chunks (if it is a thin-skinned potato, all you need to do is wash and cut), rice, or other grain. When it comes to rice, I usually add it to the soup bowl and pour the soup over it. Rice disintegrates over time if it sits in soup for too long, and will turn to mush if you freeze leftover soup. However, you do you.
-When you get more confident in your soup making, you can add a little “acid,” which brightens up the soup. A small amount of dry white wine, dry sherry, hot sauce, or even vinegar can transform a soup (just use one). Think ¼-½ cup wine/sherry, a few shots of hot sauce, or a tablespoon or less of white vinegar.
-I often make the soup in the morning and then let it cool. I’ll use a colander and separate the broth from the solids, and then pick out the bones from the meat and vegetables. The bones are discarded, and the rest is returned to the pot. Conversely, if I have some cheesecloth, it is easy to place the carcass in the cloth, remove the fabric after cooking, and pick off the meat to return to the soup.
-If you are making a simple chicken soup, add water (if needed) to the desired dilution (this is usually none or a cup or two, don’t go overboard), and adjust the salt level carefully, ½ teaspoon at a time. Add and taste until you are satisfied.
Cream option
This is the version that my kids go for.
The first part of this soup making is the same as above. However, don’t adjust the soup concentration as you will be diluting the soup with dairy products. I may use slightly less initial water when cooking the soup.
-Put roughly 1 cup of sour cream in a bowl and add about ½ cup of broth and stir it in. This will make it easier to incorporate the sour cream into the soup. Stir the sour cream mixture into the hot soup. Add approximately ½ to 1 cup of half-and-half or whole milk, and stir it in. You can adjust the sour cream and milk/half-and-half to your preference, as I’m just “guesstimating” the amounts. Adjust the salt level, add a little more pepper if desired, or a shot or two of hot sauce (we like Frank’s). We don’t like “hot” foods, so we just add enough to add warmth and interest.
If the soup is too thin, I’ll mix a heaping tablespoon or two of cornstarch with a few tablespoons of cold water and pour it into the boiling soup in a stream as I stir the soup. This will thicken it nicely. Sometimes I’ll add a sprinkle of powdered garlic (remember, I love garlic). The secret is to taste and adjust in increments.
We will serve the soup with a variety of bread products, ranging from tube refrigerator rolls to homemade savory muffins to crackers. It is all good.
We usually have enough soup to feed everyone, plus leftovers. The leftovers will often disappear, as they are great for lunch the next day. If there is still leftover soup, I’ll freeze individual portions in vacuum-seal bags that can be reheated by boiling.
One simple, cheap $5 chicken yields two full meals with leftovers for several lunches. How can you beat that? The results will taste better than any canned soup. How good is it? My kids get excited when I make it, as it is a taste of home.
Bon Appétit
Mike
I’ll break up the carcass so it fits in the pot. I’ll add carrots, celery, garlic, onion, and some salt and pepper. I’ll always add an extender like “Better than bullion.” I’ll add just enough water, usually enough to cover most but not all of the chicken. If cooking in a pot and not a pressure cooker, make sure the vegetables are in the water. If all you have is salt and pepper, that’s fine. However, I’ll add some spices that I have to enhance the flavor. I’ll usually add 1/2 to a scant teaspoon of each of the above. If you only have some of these spices on hand, that works too! When it comes to salt, I initially only add around one teaspoon. I’ll adjust the salt at the end of cooking. Since the chicken is already cooked, I’ll pressure cook for only 15-20 minutes. If I were using fresh chicken, I would pressure cook for around 25-30 minutes. If I were cooking in a regular pot (without a pressure cooker), I would bring the mixture to a boil and then reduce it to a simmer. I would cook for at least 60 minutes or longer (hours) to enrich the flavor. You can make your starch directly in the broth. I prefer to make it separately as I have more control over the finished product. My family prefers the cream version of chicken soup, which is achieved by adding around one cup of sour cream and some milk/half and half/heavy cream (your choice). I’ll usually thicken the soup with some corn starch dissolved in cold water and then streamed into the boiling soup. Always adjust your seasoning at the end of cooking. In this case, when the soup is ready to be served. Served up, soup is a complete meal. Here, I’m serving it with some oyster crackers, but bread, savory muffins, or many other options can also be used.
Food has always been a large part of most people’s budgets. Inflation is a pain if you have financial resources, but it is devastating if you have been living paycheck to paycheck. As money becomes tight, people rely on other sources of cash, including credit cards, which adds more to their financial woes.
You can delay purchasing a new TV or pause on updating your wardrobe, but you can’t stop eating. I grew up in a family of seven. My dad worked, but my mom did not work outside the home. We always had food on the table, and because my mom was a great cook, it was always delicious. However, she employed many budget-stretching techniques, some of which seem lost in today’s world of fast food, prepared meals, and restaurant eating.
In the early years of my marriage, I embraced many of the modern eating patterns. When my kids were young, it was common to go out to dinner once or twice a week, and we frequently went out to breakfast after church on Sundays. Fast food was a big part of our diet and it wasn’t uncommon for us to grill steaks for dinner because we had a “taste for them.” Much of that has changed in our household, we are economizing but not feeling deprived. In many ways we are eating better than we did in the past.
How is that possible? I do most of the grocery shopping and meal preparation at our home (I’m retired) and have employed many techniques I observed while growing up. Additionally, I was divorced from my first wife and poor during the early years of my career. I developed options to survive on the smallest grocery budget possible. Lastly, over the last decade I have taught my kids how to cook and in doing so I have refined and simplified that process. In today’s post I aim to show new budgeters some of those techniques.
Teaching my kids has been a joy. We now work as a single unit in the kitchen and have great fun making meals together. Here we are making some chicken fried rice.My kids have also become accomplished bakers.
What this is not.
Many articles and YouTube videos have titles like: “I survived spending only $1 a day for food,” or “How I fed my family of 4 for only $25 a week.” God bless those individuals as their methods often combined starvation with monotony. My goal has never been to eat as cheaply as possible, it was to reduce costs. We are well fed in our house and still have found ways to economize.
What this post is.
My goal is not to have you incorporate every idea listed. If you are new to trying to reduce grocery costs, start by emphasizing spending less at the grocery store, and do that by using a method that works for you. Add other savings options as you become more comfortable, ignore options that I present that make little sense to you, and incorporate things that work for you that I have neglected to list. This post is intended to be a springboard for your creative process. It is meant to inspire you, not to overwhelm you.
We eat regular food.
There are always ways to economize no matter what diet you ascribe to, but the more restrictions you place on your eating, the more difficult it becomes to economize. Can you find multiple ways to reduce food costs if you are vegan, gluten intolerant, or wholly organic? Yes, of course. However, we are traditional eaters in our home, which gives us more saving options. You may object to some of my methods, citing that we should eat how you eat. I respect your choice, but you do you and let us do us.
The simple steps to saving money on food.
Buy cheaper
Buy less
Make from scratch
Keep food making simple
substitute
Be varied
Use it up
How to spend less money on groceries
There are many ways to save at the grocery store, but it is unlikely that you will use all of them. The best approach is to start with options compatible with you and then add or subtract techniques that work, or don’t work, for you.
I have always been fascinated by those who are good at coupon clipping. However, I am not one of those individuals. Likewise, I have a niece who is a pro at using a store’s digital grocery coupons, sometimes saving 30% of her bill. Using an app before or while I shop is a frustrating pain for me.
Others will shop multiple stores every week to find the best deals and loss leaders. I admire them, but I’m usually “done” after buying a week’s groceries at a single store.
Choose and become familiar with your main store.
I go to the store with the lowest overall prices to save money on groceries. In my neck of the woods that means Walmart or Aldi. I was a Walmart shopper for many years but slowly abandoned shopping there. Why? for multiple reasons: The store is gigantic, and I would end a shopping trip exhausted. There were so many choices that I would get decision fatigue comparing items and their prices. The store has so many products that I always bought more than I intended, and I despised self-checkout when I had a cart full of groceries.
This last reason is why I quit Walmart as my main grocery store. I had a full cart of groceries and there were no checkers, so I was stuck sorting items on 18” counters. I had to place things back in my cart and separate them as I checked myself out. At the same time, I was scanning and looking up fruits and vegetables on the touch screen. Our Walmart has an employee who stares you down like you are trying to steal something. It is very uncomfortable. Naturally, the machine froze, requiring me to wait for that person to release it. My final straw was when I went through that ordeal only to have the lady at the door want to review my receipt and check every purchase that I made. Nothing like a store that makes you feel like a criminal. What did they find when they reviewed my cart? They found that I paid for every item. However, that was the final straw for me.
I switched to Aldi and have never looked back. In our area, Aldi generally offers prices lower than Walmart and much lower than traditional grocery stores. Aldi has its limitations, but many of them benefit me. Aldi mainly sells house brands, but their quality is good. If you want a product, like catsup, there is only one brand to choose from. That is fine because I don’t have to ponder which item to buy. Because they have fewer brands, the stores are small and less fatiguing. Ours has super fast checkers, taking that burden away from me, and large areas to pack groceries. Aldi does run sales, but they are very clearly marked and don’t require coupons or apps. I always spend less (compared to when I shop at any other grocery store) at Aldi. That is even when I bite the bullet and use another store’s digital coupons.
Aldi stores are much smaller than a typical US grocery store making it much easier to shop there.
Aldi has limitations and eliminates many of the frills that other markets have. You won’t be able to get a decorated cake at Aldi, and there isn’t an on-site butcher. Additionally, Aldi has limited products. You can buy any cake mix, as long as it is chocolate, white, or yellow. Need some spices? Aldi sells them at a great price, but don’t get too exotic. I have never seen the spices as basic as bay leaves or thyme at Aldi. However, stopping at another store to get those things is easy and economical as long as I buy just what I need.
Basic spices are very inexpensive at Aldi and are of good quality. However, you will likely need to go to another grocer if you need anything beyond the basics.
Consider house brands.
When I was a resident physician I made little money. Additionally, I was paying child support and had to live alone in my own apartment as my daughter stayed with me every other weekend. Money was extremely tight. In those days, grocery stores featured “generic” products, and I bought them because I had no choice. However, generic was not the same as a house brand. They were of inferior quality. One time I opened a can of green beans that contained an entire plant, stem, leaves, and roots!
I have found that house brands are typically very good quality, and their quality has increased. My kids like Oikos yogurt, and my wife will sometimes buy that brand if she finds it on sale. However, the Adli brand tastes pretty good and is significantly cheaper. When my adult kids said, “Dad, we prefer Oikons,” I said, “Feel free to buy it; if not, I’ll buy you the Adli brand.” Given the option of buying their own, they happily ate the Aldi yogurt.
Of course, high-end products are likely better than house brands. I read recipes where the writer tells the reader to use a particular canned tomato or mayonnaise brand. However, we are not “high end” here. We are just regular eaters.
Consider making your coffee.
Buying coffee every day is a costly proposition. You can make your own for pennies on the dollar. Making coffee can be extremely simple or very complicated depending on your desire. Instant coffee (trust me, you can get used to it) is incredibly cheap and as easy as adding a teaspoon of the stuff to hot water. There are also a multitude of coffee makers available, from drip to French presses to Keurig style. You can buy a reasonable drip coffee maker for $20-$50. Using coffee pods is the most expensive way to home brew, but still much cheaper than buying Starbucks. Lastly, making your coffee at home is more convenient than waiting in line at a store.
We buy whole beans at Costco and grind our coffee for each pot. We have a Bunn coffee maker, which was expensive but has been continuously used for over 10 years.
Do we ever buy coffeeshop coffee? Yes, but mostly when we are meeting someone at a coffee shop.
Adjust your diet based on current costs.
Eggs were a mainstay in our house when I could buy a dozen for eighty-eight cents. My daughter would hard boil a bunch for a week’s worth of breakfasts. I sometimes made them for lunch and occasionally cooked omelets for a family dinner. However, eggs have gone through the roof, and we eat less of them. I have gone so far as to purchase “egg replacers.” Egg replacers can be used in cakes, cookies, pancakes, and other baked goods. They don’t have the nutritional value of an egg, but they are relatively inexpensive and bind ingredients similarly to eggs.
I mentioned earlier that we used to eat steak regularly. It is now a “special occasion” food. When we eat steak, we cut it in half, so two steaks feed four people. That amount of meat is still more than US nutritional guidelines.
Other beef products have also become expensive, so we generally eat less of them.
Being flexible is key when it comes to saving money.
Limit buying processed foods.
I have an older relative who no longer wishes to make meals from scratch and mostly buys premade individual frozen meals. I completely respect her actions, but her grocery costs for one person are roughly the same as what I spend for four adults. Most will tell you that processed foods are not the best for you. I’m here also to say that they are costly.
That said, we do buy some processed foods. Every Friday, we make frozen pizzas for dinner. By the end of the week, no one wanted to cook, and this option worked out for us. We can always find frozen pizzas on sale. Balance and common sense are the key to sustaining a food plan.
Stick with the basics.
Another reason that I love Aldi is that many of their foods are “basic.” What are basic foods? They are foods that can be utilized in many ways. I can buy premade frozen pancakes or save money using a pancake mix. Even better is making pancakes from scratch using flour, which can be transformed into thousands of different foods.
Do I ever buy frozen pancakes? No. Do I ever buy pancake mix? Sometimes. Do I ever make pancakes from scratch? Often!
If you have essential ingredients on hand, you can make many foods. If you buy a pizza, you have a pizza. If you purchase a jar of spaghetti sauce, you can make pizza, spaghetti, a manicotti bake, and lasagna. You can do all the above and more if you buy a can of crushed tomatoes. Sometimes I’ll make individual pizzas on a worknight using whatever I can find in the fridge. The kids love them.
Be reasonable.
My grandmother made bread for her family every week. It was delicious! I occasionally make bread as a treat, but I mostly buy bread. Convenience is the driving factor.
I sometimes make bread as a special treat, but I mostly buy it for convenience.
I occasionally buy a pre-made refrigerator meal, and my wife loves diet soda. As I have repeatedly said, balance is key to a successful plan. How many extras you can add will depend on your cash flow. I know of families that almost exclusively drink water to save costs. Everyone has to figure out what works best for them.
Fresh, frozen, or canned?
We do buy fresh vegetables and fruit, but we buy them carefully. Certain vegetables, such as onions, potatoes, green onions, carrots, celery, and salad fixings, are reasonably priced. Likewise, bananas and some apples can be good values. Other fruits and vegetables can be bought when purchased in season. However, how fresh is fresh? Vegetables are transported to stores, often from different countries. They then sit under bright lights as they get sprayed with water. This may make them look fresh, but it also promotes mold.
Frozen vegetables and fruits are picked and processed at the peak of their ripeness. They are often less expensive than their fresh counterparts. They also last a long time in the freezer and are flexible when cooking.
Many people have negative feelings toward canned fruits and vegetables. However, they are picked similarly to frozen and are highly nutritious. They last a long time while being shelf-stable. I often add them when bulking up something like a stew or serve them as a side after adding a few additions to make them more palatable.
Cook from scratch when possible.
We do a lot of “scratch” cooking. If you know some basic cooking skills, you can make almost anything. My family and I would agree that the food we make from scratch tastes better and is less expensive than prepared foods and even restaurant meals.
Teaching my son to use a pressure cooker.
The more you cook, the easier it gets. The same techniques are used repeatedly in cooking, so when you master a method with one recipe, you can use it in a dozen more.
Consider buying a general cookbook like those from Better Homes and Gardens or Betty Crocker. They have time-tested recipes that use basic ingredients and are designed to work with inexperienced cooks. You can find hundreds of recipes online if you don’t want to do that.
Cooking from scratch can save you money.
But I only have a microwave.
I have the benefit of a fully functional kitchen. However, I know some live in basement and studio apartments and only have a mini-fridge and a microwave. You can make many things in a microwave. I traveled out of town weekly for many years working until 10 PM. I didn’t want to leave my hotel then and often made dinner in my room. Additionally, my kids have made many things in the microwave. We have made scrambled eggs, cakes and muffins, fish, BBQ turkey legs, rice, pasta, baked potatoes, bacon, regular oatmeal, tea, and much more.
Adding one appliance, like a rice cooker or an electric frying pan, will exponentially open up your culinary world. If you live in a studio apartment, you don’t have to eat out every meal.
Clean as you go.
One of the biggest lessons I taught my kids was cleaning up as you go. When I cook, I constantly wash items. I may use the same measuring cup three times, and by the time the meal is ready, that cup has already found its way back into the cabinet. Nothing will discourage your cooking more than dealing with a mound of dishes at the end of the meal. Cleaning up as you cook is a critical part of cooking from scratch.
Build your supply of staple foods.
I was going to add a link to other authors’ lists of staple foods you should have in your pantry. I decided against it because many of those lists were extraordinarily long and included items I have never used in 50 years of cooking.
Staple foods are basic ingredients that you should always keep in your pantry. However, if you are budgeting, buying all of them at once is not feasible. I suggest reserving a portion of your weekly food budget for staple items.
Start with the basic: flour, sugar, baking powder, salt, pepper, cooking oil, garlic powder, onion powder, oregano, canned tomatoes, rice, potatoes, onions, carrots, celery, frozen ground meat, and the like. Slowly build up your supplies as you can, watching for sales.
We have many staple items beyond this list, including curry powder, cinnamon, rosemary, thyme, hot sauce, powdered sugar, cut-up chicken, jar garlic, soy sauce, coconut milk, and more. However, we have built up those supplies slowly. Having staple items allows you variety when cooking. There is something you can always make.
Be flexible when cooking.
This is more of an advanced skill. I’m not afraid to substitute one ingredient for another or to even omit an ingredient from a recipe. The result may not be as intended, but it will still be good. A simple example would be to exchange a can of whole tomatoes for crushed tomatoes. However, this is just the start of what you can do. If you don’t have a particular spice, you can often substitute with something similar or leave it out altogether. Only have 1 pound of ground meat and the recipe calls for 1.5 pounds? Make up the difference with another filler. However, if you are just starting to cook, follow recipes as well as you can until you are wholly comfortable switching things around. I’m usually successful at substituting ingredients but I still make “fatal errors” occasionally, so caution is advised.
I made a soup/stew from whatever I could find in the fridge. Italian sausage, some wilted spinach, carrots, and this and that. It was delicious and the kids loved it. Cooking ad-lib takes a little practice so don’t be discouraged if your results are less than perfect the first few times.
Buy and eat less meat.
All meat is expensive, but beef takes the prize. Even cheap cuts are now costly. Sometimes you can substitute one meat wholly or partially in a recipe. For instance, you can do a 50/50 split of hamburger and ground pork when making meatloaf. This will result in a tastier product. We sometimes use ground turkey instead of ground beef with excellent results.
We often make many combination foods that use less meat. Think soups, stews, casseroles, hot dishes, stir fries, loaves, and more. These are delicious, filling, and nutritious and can often be made in a single pot or pan, so cleanup is a breeze. Making combination foods is as important as choosing the right grocery store to save money.
There are so many wonderful ways to use less meat. Here I’m serving a chicken and pepper stir-fry.I picked up some butternut squash and turned it into a copycat Panera winter squash soup using an on-line recipe and my pressure cooker. I added a protein rich salad and a slice of homemade bread for a pretty darn good meatless dinner.
Consider meatless meals.
If you can go vegan or vegetarian, more power to you. We are not there yet. However, we will often have meatless meals that we all love. My kids get excited when we make homemade potato pancakes or mac and cheese, and my wife and I love lentil and bean dishes, which can be made with very little meat or are entirely vegetarian. There are many ways to make delicious foods that don’t require meat.
KISS
Keep it simple, silly. Basic foods, ingredients, and cooking make a sustainable behavior change.
Do a food inventory and make a list before going to the store.
Check out what you already have before going grocery shopping. A time-honored way to save money at the grocer is to create and stick to a list. Of course, don’t go to the store hungry!
Use it up.
We are good at using meat before it spoils and finishing leftovers (often for the next day’s lunch). However, we need to improve our use of fruits and vegetables. We are trying to do better by taking inventory of what fruits and vegetables are on hand and incorporating them into our meals. Additionally, we pay special attention to those items that are declining. For example, wilting celery is still terrific when used as an aromatic in a soup, stew, or casserole.
Make what you have, not what you want.
We mostly avoid making meals based on what we have a taste for. Instead we cook based on what we have on hand. This eliminates another form of decision fatigue and allows us to use up items that would have gone bad. My daughter used half of a jar of spaghetti sauce for a spaghetti lunch. I used the remainder to make an impromptu pizza.
Consider making a menu.
Another time-honored money-saving tip is to make a weekly menu. Sadly, I have been unable to do this formally. You may be better at this than I am.
Make less/Eat less.
As a poor medical resident, I made enough food for two meals. I would immediately separate half of the food into a travel container. The first half would be my dinner, and the second half would be my lunch the next day. I ate better than many of my cohorts who bought their food daily.
I have constantly had to battle with obesity my entire life. The first time that I lost 100 pounds was in the 7th grade! I gain weight very quickly. I have adopted a way of eating called “cafeteria style.” If you have ever bought a meal in a school cafeteria, you know you get a portioned amount of items. That is what you eat, no more. When I eat at home, I portion out a similar amount of food and try (not always successfully) to only eat that amount. There is no need for me to go back for seconds and thirds as to do so results in a negative outcome.
My wife taught me the trick of using a smaller plate when eating dinner. Here I made a chicken paprikash, spaetzle, and some broccoli.
We often have leftovers that the kids take to work, but I try to make only a reasonable amount of food to avoid food waste.
Buy good items that are reaching expiration.
One of our local grocery stores often sold items nearing expiration but still perfectly good. Meats could be found for more than half off. I would buy these in bulk, portion them in vacuum-sealed bags, and then freeze them. However, recently, I have had a few experiences where I had to return meats as they were past their prime and I am no longer practicing that habit. If you have a reputable store, find out when they re-label items for bargain prices.
Portion out meals.
I avoid places like Costco as I always spend more than I intend. However, I still shop there occasionally as the quality is excellent. This is especially the case with bulk meats.
When I get home, I divide the bulk package into meal-size portions and then vacuum seal and label each package for the freezer. Meat can stay fresh with no freezer burn for over a year.
We had to buy several major appliances last year from Costco, which gave me quite a few Costco bucks. I used them to buy meat that will last us a long time. I like to portion out the meat into vacuum seal bags and then freeze it.
Learn the art of preservation.
There are many ways to preserve food, here are two ways we do it:
The vacuum sealer
I have used a vacuum sealer since the early 1990s and have saved a lot of money in the process. I freeze meal-size portions of meat for main courses and vegetables for soups and stews. I’ll also freeze individual portions of leftovers that I can pop directly in boiling water for a quick lunch. Additionally, I freeze many dry items. For instance, I buy bulk rice, which I portion and vacuum seal in 1-2 pound bags.
I now use a chamber style vacuum sealer, but a regular (and inexpensive) tray-style vacuum sealer also works well.
Name-brand vacuum sealer bags are excellent but expensive. I use off-brand brands with good results. Over the last few years, I have switched from a standard home vacuum sealer to a chamber-style one. Chamber vacuum bags cost only pennies, often the same price or lower than a Ziploc bag, but they are much stronger and more resistant to freeze burn.
The freezer
We have owned a separate freezer for over 30 years. It is a manual defrost model that costs very little to operate, only a few dollars a month. The freezer allows us to buy cheaper meats in bulk (which I then divide up), buy items on sale, buy items that are good but are reaching their expiration date, and much more. It is also convenient to have extra freeze space to hold that emergency frozen meal or an extra pizza to serve a friend who makes a surprise visit.
Consider buying one of these appliances when you can afford to do so.
I am a gadget lover who has been buying small electrics for my entire adult life. I have just about every gadget that you could imagine. Some of you are likely attached to a small appliance and may covet your toaster oven, or rice cooker (to name a few)—more power to you.
However, two appliances stand out for working individuals who want to transition from eating out to making food at home. Consider one or the other (or both!).
I purchased a 2.5-quart, very basic slow cooker for $9 as a medical resident, and I used it extensively to make many different meals. For instance, In the morning I would toss a couple of pork chops in it with a drained can of sauerkraut, a grated apple, a little brown sugar, and some caraway seeds (if I had them). That evening I would have a delicious dinner (plus a lunch the next day) waiting for me.
Slow cookers can be purchased for as little as $20 (fancy ones cost more) and are very easy to use. They are great for those who can plan meals in the morning, and they also save energy. I suggest a 4-quart size for an individual or small family and a 6-quart model for a larger family.
The other appliance to consider is a pressure cooker; the most energy-efficient appliance I have ever tested. Pressure cookers sometimes frighten people, but the new ones employ many safety features. You can buy a stovetop or electric version; both have advantages. I recommend an electric pressure cooker, like the Instant Pot, for the new cook. If you shop around, you can buy a decent one for $60-$80. Pressure cookers are great for those who don’t want to bother with morning prep but also don’t want to spend a lot of time cooking when they get home. Pressure cookers can cook food in about ⅓rd of the time compared to traditional cooking methods. You can make a delicious soup from scratch in under 13 minutes of pressure. A 3-quart pressure cooker works well for singles and couples, a 6-quart is best for most others.
A pressure cooker is a welcome addition if you want to make real food really fast.
With both appliances, you have the advantage of one-pot meals, which means less cleanup. It is also easy to make a larger batch for tomorrow’s lunch or to freeze away for a future meal.
Should you upgrade your cooking gear?
You likely have everything that you need to make, just about anything that you want to make. However, good equipment makes cooking easier. I use an inexpensive pull-through knife sharpener every time I cook. I use small electrics. I like quality cookware, and my Dutch oven is my favorite pot. However, I have built my cooking gear over 50 years. All you need is a chef’s knife, a big pot, a saucepan, a frying pan, and some cheap utensils. You don’t need to spend a ton of money to save money. Shop second hand or garage sales. They are great places for cookware and appliances like crock pots. Request items as gifts, start a gear fund or shop sales, or do none of the above and work with what you have. It is all good.
Conclusion.
Remember, progress, not perfection. You will likely fail if you immediately try to implement all of my suggestions. Come up with a solution to save money at the grocery store and then implement a few of my tips. Add and subtract options as indicated.
We are not deprived in our household. We eat very well while eating less highly processed food. Yes, we have snacks and desserts too. Our goal is to maximize our savings while minimizing deprivation. Try the same.
My kids made me this wonderful Father’s Day cake.Saving grocery money is not about deprivation, it is about being reasonable. Here I’m having a delicious homemade strawberry shortcake.
Peace
Mike
Addendum: I mention my efforts and my kids a lot in this post. Please note that my wife is also involved in a lot of meal prep!
I enjoy being retired because I can explore obscure topics without feeling guilty that I should be doing “real work.”
In my last post, I investigated the energy efficiency of tabletop cooking appliances and was surprised by how energy-efficient pressure cookers were. Some were over eight times more energy efficient than a large crock pot I tested. That was amazing, so I thought I would research them more.
Pressure cookers have always remained popular in countries with high energy costs or limited energy resources. However, they became less common in the US market after microwave ovens and crock pots gained popularity in the 1970s. However, they have had a significant resurgence since the introduction of the Instant Pot in 2010.
In the late 1600s, Denis Papin developed a primitive pressure cooker called the Steam Digester. It was used to extract fat and break down animal bones.
The Steam Digestor-Image from Wikipedia.
In 1857, Louis Pasteur published his first paper on the role of bacteria in fermentation, heralding an understanding of the role of microorganisms in cheese production and milk spoilage. His research led to the germ theory and the role of microorganisms in disease.
By the late 1800s, manufacturers were using pressurized steam to sterilize the contents of canned foods. In 1905, the National Pressure Cooker Company (now National Presto Industries) started manufacturing large pressure canners for commercial operations. In 1917, the USDA established a canning pressure of 15 PSI as the standard. The USDA deemed pressure canning the only way to safely can low-acid foods (meats, beans, etc.). Canner retorts are the predecessors of the home pressure cooker.
Alfred Vischer introduced the first home pressure cooker, the Flex-Seal Speed Cooker, in 1938. However, the Presto pressure cooker, introduced at the 1939 New York World’s Fair, was the one that caught the attention of homemakers. The Presto was revolutionary as it utilized a simple twist on the pressure lid instead of relying on screws or clamps. The 1930s were a time when home kitchens were starting to modernize. One can only imagine the significance of the pressure cooker, a device that could cook food three to ten times faster than conventional methods. Pressure cookers became a hit, similar to the home microwave oven’s popularity when they became affordable in the 1970s. The original Presto Pressure Cookers were made of aluminum.
The Flex-Seal Speed Coooker-Image from eBay seller.
World War II ended consumer manufacturing as industries were reassigned to the war effort, but demand for pressure cookers remained high. Presto stopped manufacturing pressure cookers but continued manufacturing retort canners, deemed necessary for the homefront war effort. However, they were made of steel, as aluminum was too crucial for the war.
Companies in the US resumed production of home pressure cookers in 1945. Since there was a high demand for pressure cookers, multiple manufacturers took on the task. Some companies were more concerned with profit than safety and produced unsafe units. Stories about pressure cookers exploding are from this time.
Any kitchen tool can be dangerous, from a dull kitchen knife to a saucepan left unattended on a stove. Modern pressure cookers are kitchen tools, so they fit into this list. However, they have multiple safety features built in and are very safe if used according to common sense and the provided instructions.
My pressured story
I grew up in a household that used a pressure cooker several times a week. My mom made the most amazing soups, stews, goulash, chicken paprikash, chop suey, pot roast, swiss steak, and so much more in her Model 40 Presto aluminum pressure cooker. The cooker was built like a tank, and she also used it as a regular pot by leaving off the pressure regulator. It was the gadget of choice to make popcorn as its thick base made burning popcorn less likely.
This is exactly how I remember my mother’s Presto Model 40. Purchased some time in the 1940s and still in active service 80 years later. Image from an eBay seller.
This old-style unit operated slightly differently from more modern cookers. You waited until a stream of steam came out of the vent tube before popping on the regulator, which seemed to have a spring design as it allowed you to cook at several pressures. I’ll talk more about regulators later in this post.
My mom used that 4-quart cooker to feed a family of seven until the mid-1970s when she bought an aluminum 6-quart Presto. She continued to use both pots depending on her cooking needs. The new pot had the more familiar “jiggler” style pressure regulator. Both required very little maintenance. Every year or two, my mom would send me to our local 5 and 10 store to buy a rubber gasket, and I also recall going there once to buy a rubber pressure plug. Both purchases were inexpensive.
This Presto is very similar to the 6-quart cooker that my mom bought in the 1970s. It was functional when I inherited it, but its flakey paint made me not use it. Image from an eBay seller.
When my mom passed, my sister got the Presto model 40 and continued to use it regularly until 2017, when her operator error destroyed it. Since the Model 40 was produced in the 1940s, that pot lasted almost 80 years! I was given the 6-quart Presto but didn’t use it much. The yellow paint on its exterior was badly flaked and looked ugly. Instead, I bought a new stainless steel pressure cooker and continued the family cooking tradition.
I’m a gadget guy, so I have many kitchen appliances. I find learning how to use them enjoyable. During my adult life, I have used all sorts of pressure cookers in various situations, including when I camp. I am sold on them and know they are both speedy and efficient. However, I didn’t realize how energy-saving they were until I researched my last post.
In that post, I discovered stove-top and electric (think Instant Pot) pressure cookers were significantly more efficient than slow cookers. I always thought the Crock Pot was the small appliance energy king.
Why are pressure cookers beneficial?
They cook 3 to 10 times faster than standard cooking methods.
They are one of the most energy-efficient cooking appliances.
They retain nutrients more than many other cooking methods.
They are highly versatile and can cook anything from a hearty bean soup to a delicate cheesecake.
They can transform tough cuts of meat into tender, delectable dinners.
They can cook multiple foods at once without mixing flavors.
Dehydrated foods like dried beans can be cooked without pre-soaking.
How can they cook as fast as they do?
Pressure cookers require liquid, which they boil and turn into steam. That steam pushes out the air in the cooking vessel, at which point the pot seals and pressure builds in the pot.
Liquid water is always trying to turn into a gas. If you pour some water on your driveway, it will evaporate into a gas. You can accelerate that evaporation process by adding energy to the water in the form of heat. The water will boil, and you can see the evaporation process as steam. Water boils at sea level at 212F (100C). No matter how much energy you supply to the pot, the liquid water will never exceed 212F. It is at equilibrium with atmospheric pressure pushing it down at 15 PSI (pounds per square inch).
Water will boil at a lower temperature at high elevations where the atmospheric pressure is less than 15 PSI, and the converse is also true. If there were a way to increase the atmospheric pressure above 15 PSI, water would boil at a higher temperature. A pressure cooker can do just that.
The atmospheric pressure at sea level is 15 PSI. A standard American stove-top pressure cooker operates at two times this atmospheric pressure (15 PSI + 15 PSI = 30 PSI), allowing the water in the vessel to be heated to 250F (121C) instead of 212F (100C), and this cooks food faster.
PSI’s impact on the boiling point of water. Image from hippressurecooking.com
But why does a pressure cooker cook foods faster than an oven, which can reach 400F and beyond? Food cooked in an oven has an insulating layer of cooler air around it, slowing down the cooking process. Convection ovens use a fan to break through that insulating layer partially, so they cook faster than conventional ovens. Pressure cookers eliminate the air-insulating layer by pushing it out and replacing it with scorching steam.
Additionally, all foods are mostly water. A carrot is around 88% water, and a pot roast is around 70% water. Under normal atmospheric pressure, this internal water can only be heated to 212F at sea level (just like the water in the pot itself). However, it can reach higher temperatures under pressure, allowing food to cook faster. That additional heat breaks down connective tissue faster, which is how a tough pot roast can turn into a delectable dinner in only an hour of cooking.
I just told you that water’s boiling point depends on atmospheric pressure and that water boils at a lower temperature at higher altitudes as there is less atmospheric pressure. This reduction in boiling temperature can lengthen the time it takes to cook something in a pot, and the same is valid for using a pressure cooker at high altitudes. A US stove-top pressure cooker will increase the pressure in the cooking vessel by 15 PSI above the outside pressure. The general rule is you need to add around 5% more cooking time for every 1,000 feet above 2,000 feet elevation. If you are cooking something that requires 60 minutes of pressure cooking time at sea level, it may take 63 minutes at 3000 feet above sea level.
Secret Added Time.
It may sound impressive that a pressure cooker can cook something in less time needed by traditional methods, but that time is calculated after the appliance has reached pressure. The liquid has to boil and create steam for this to be accomplished, and depending on the volume of liquid in the pot, that may take a bit. As a loose rule of thumb, assume around ten minutes to reach pressure, at which point timing begins. If a dish says it will be done in 15 minutes, add the boiling/pressure-building time. That would be 10 min (pressure building time) + 15 min (pressure cooking time) or 25 minutes total cook time.
Quick Release vs. Natural Release.
The heat is turned off at the end of pressure cooking time, but the food continues to cook. Recipes will either tell you to let the pressure come down naturally or to release it quickly.
In a natural release, you let the pressure come down naturally. Often, this means waiting 10 minutes and then doing a quick release. Food will continue to cook in this mode, but slower. Meats, like beef, can become dry if you do a quick release, as the change in pressure will pull moisture out of them. A natural or slow release prevents this.
A quick release is most commonly done by tilting a jiggler-type regulator or moving a lever on a spring-type regulator (see your instruction book). Some old stove-top books may tell you to put the base in a pan of water or to carefully run cool water on the lid. A quick-release stops cooking and is used for many delicate foods, like fish and vegetables. Editor’s Note: NEVER place the base of an electric cooker in a pan of water, and NEVER run cool water on the lid of an electric cooker. You will destroy it if you do.
Different manufacturers use different pressure standards.
A word of caution: US stove-top cookers typically pressurize at 15 PSI, modeled after USDA requirements for sterilizing foods. Their operating temperature is 250F (121C). European stove-top cookers often pressurize to 13 PSI; their operating temperature will be 245 F (118C), not 250 F. Some Chinese stove-top pressure cookers operate at 8 PSI, yielding only 234F (112C).
Most electric pressure cookers cycle between 10-12 PSI and cook at a lower operating pressure than a standard US stove-top. This means you may need to adjust cooking time with different pressure cookers. For instance, something that would cook for 45 minutes using a standard 15 PSI stove-top pressure cooker may take up to 60 minutes using a typical electric pressure cooker.
Some manufacturers produce cookers whose operating pressures are different from model to model. The Spanish company Magefesa does that. Some pressure cookers have US and European models that pressurize at different levels. The German Fissler brand cookers use 13 PSI in Europe and are recalibrated to 15 PSI for their US versions.
A Fissler German pressure cooker. Pricey but well thought of. Image from Amazon.com
Many pressure cookers list their operating PSI (or kpa) on their product page or the cooker. If you can’t find the operating pressure of a pressure cooker, you will have no idea about proper cooking times.
Although making adjustments between machines may sound confusing, they are easy to implement. Cookbooks written for a particular appliance and the recipe books provided with the gadget will automatically give you the correct cooking time. Additionally, you will likely gain an intuitive understanding. For instance, if I use an Instant Pot recipe on a stove-top pressure cooker, I know to reduce the time a bit. However, when purchasing, I would stick with a standard 13 or 15 PSI stove-top or a 10-12 PSI electric pressure cooker (Instant Pot and many others). There is a wealth of information on these devices and tons of recipes.
A real pressure cooker danger.
Some exotic pressure cookers, like the Instagram-trending Afgan pressure cookers, may be dangerous due to contaminants. Afghan pressure cookers use reclaimed aluminum, sometimes from old car parts. Afghan pressure cookers have been known to leach lead into foods.
PSI vs. kpa.
Pressure can be measured in several different ways. For US pressure cookers, we use PSI (pounds per square inch); for the rest of the world, they use kpa (kilopascals).
15.0 PSI = 100 kpa temp 250F, cook time 23% of traditional cook time
13.0 PSI = 90 kpa temp 246F, cook time 27% of traditional cook time
11.5 PSI = 80 kpa temp 242F, cook time 32% of traditional cook time
10.0 PSI = 70 kpa temp 241F, cook time 33% of traditional cook time
8.0 PSI = 55 kpa temp 234F, cook time 40% of traditional cook time
Pot-in-pot cooking.
It is possible to put another cooking vessel inside your pressure cooker. For instance, you can put a springform pan inside to make a cake or cheesecake (made under steam). You can also buy inexpensive stacking pots that fit typical pressure cookers. Using this method, you can cook two foods simultaneously, and their flavors won’t mix.
Different types of lids.
The lid on a pressure cooker must be secure, or it will fly off when under pressure. Presto revolutionized the home cooker by using a flange/twist-on design that is still very popular today. Some manufacturers use other methods that have also been proven to work. For instance, some third-world countries produce cookers with clamp-on lids as this style is more straightforward to manufacture. The famous Indian company Hawkins makes cookers that use a tip-in and clip lid. As long as the lid is secure, all is good, no matter the design.
Can I fill a pressure cooker to the top?
No. The maximum you can fill a pressure cooker is ⅔ full, as you need room to generate steam. Some foods can only be filled ½ way (for instance, rice and beans) as they tend to expand and could block the vent tube. The instruction book supplied with your machine can provide you with more details.
Maximum filling levels for pressure cooking. Image from hippressurecooking.com
Do I always have to add liquid to my pressure cooker?
Yes, your pot must have liquid to operate under pressure. Depending on the cooking time, a cup of water will usually do. Naturally, liquid dishes like soups already have water in them.
Why does my electric cooker say “BURN” on its display?
Electric cookers are limited by their heating elements. If you don’t have enough liquid in them or the only liquid is very thick, like tomato sauce, the cooker may burn some of the food on the bottom of the pot. This can cause temperatures to rise, which is then sensed by a thermostat, and the cooker will shut down to protect itself. It is essential to read recipes as they stipulate how to put food in a pot. For instance, a recipe may say to add broth and then tomato sauce but not mix the two. The broth can turn to steam, and you won’t get a “BURN” warning.
Do I need a cooker that can operate at multiple pressures?
Some pressure cookers can operate at more than one pressure. However, the vast majority of pressure cooker recipes use high pressure. For most, having only one pressure is all that you need.
Can I use my home pressure cooker for pressure canning?
Probably not. First, you must ensure that your unit operates at 15 PSI (the USDA standard) and maintains that pressure. Sterilization is based on both temperature and time. However, there is no way that a consumer can safely calculate a pressure cooker’s internal temperature. Poorly canned foods can breed a deadly organism called Clostridium botulinum. This bacteria produces the botulism toxin (botox), one of the most deadly neurotoxins. A very tiny amount can kill you. This botox is the same substance used to give people chemical facelifts, as it paralyzes the nerves controlling facial muscles. However, that substance is medical grade and precisely diluted. The bottom line is that If you are into canning, you are best off buying a pressurized canner (retort canner) designed for the job. Canners are calibrated and designed to get up to and maintain 15 PSI.
Are pressure cookers safe? I hear that they explode.
Some pressure cookers built during the 1940 post-war times were shoddy and could rupture. Modern pressure cookers have multiple safety devices and are safe if you follow reasonable operating procedures. Can you force a pressure cooker to explode? That is unlikely unless you deliberately modified it, as was done in the Boston Marathon bombing. The worst that can happen is that one of the safety mechanisms would activate and release a blast of steam, potentially spewing boiling water and food, providing you with a mess to clean up. I have used all types of pressure cookers for over 50 years and have never had a problem. However, use common sense; don’t leave the house when operating a pressure cooker. I stay in or near the kitchen using a stove-top unit and remain within earshot when using an electric pressure cooker (which is more automatic).
Are aluminum pressure cookers safe?
The urban legend that aluminum pots cause Altzehiemer’s disease has long been debunked. However, aluminum may leave acidic foods, like tomato sauce, tasting metallic. This is not dangerous. I have never tasted this, so that this ability may be genetic. Anodized aluminum does not impart a metallic taste.
Aluminum pressure cookers are cheaper than stainless steel pots but are only manufactured as stove-top units. The American Test Kitchen advises getting a stainless steel cooker due to the metal taste issue and their concern that an aluminum pot is less durable. However, my mom’s aluminum pot was almost 80 years old before an operator error destroyed it, so I would say that they are still pretty durable.
I would choose stainless steel if you can afford it, but go for aluminum if cost is a significant issue.
A typical aluminum pressure cooker. Image from Amazon. com
Do pressure cookers have parts that I need to take care of or replace?
Despite their advanced abilities, pressure cookers are relatively simple devices. A few parts may wear out over time.
-The gasket is a silicon ring that seals the lid and pot. I remove mine and wash it separately. I then replace it or leave it loose in the pot to be placed the next time I use my pressure cooker. Never store a pot with the gasket (seal) in place and the lid locked. This will squeeze the gasket and may impact its ability to seal. If a pot can’t hold pressure or the gasket looks damaged, it should be replaced with the same type. If you have a brand-name cooker, you can find gaskets specifically for that brand. If you have a Chinese no-name cooker, you can measure the inner diameter of the gasket in centimeters and find a replacement on Amazon, Walmart.com, or eBay. Different gaskets have somewhat different builds, so try to find one similar to your original if you have a generic cooker.
Some people keep several gaskets, one for savory foods and another for desserts, as a gasket can pick up odors. I sometimes use the top rack of my dishwasher to clean a removed gasket. Some say soaking a gasket in a diluted vinegar solution can eliminate “gasket odor.” Gaskets are inexpensive, so having an extra one on hand is a good idea.
My mom would have to change the old rubber gasket on her Presto every year or two. Current silicon gaskets are advised to be changed every 2-3 years. However, I check mine to see if it looks good and works OK. If so, I continue to use it. My Mealthy electric pressure cooker is 6 years old, and I still use the same gasket.
-Another replaceable item is the float valve. When the cooker is pressurized, this valve pops up an indicator on the lid. It also seals the pressure cooker and locks the lid from opening. The part that may go bad on the valve is the little silicon ring at its base. If your cooker isn’t pressurizing or this silicon ring looks damaged, replace it.
Should I buy a Chinese or off-brand pressure cooker?
Brand-name cookers stand by their pots. Presto makes reasonably priced pressure cookers, and they still have parts for cookers that they sold 50 years ago. Kuhn Rikon, Fagor, and Fissler are long-standing, reputable European companies. Instant Pot seems to support their electric pressure cookers (at least to a degree).
However, I have used several Chinese stove-top and electric pressure cookers that seem to be well-made. If you buy an off-brand stove-top, ensure the pressure cooker reaches 15 PSI. Some sold on eBay and Amazon do not, reaching only 8 PSI.
As far as I know, most electric pressure cookers cycle between 10 and 12 PSI, so recipes used from one electric cooker to another don’t need to be adjusted. I have used my Mealthy electric pressure cooker for years, and it works as well as an Instant Pot. The Mealthy was roughly the same price as a similar Instant Pot but came with extras, impacting my decision.
Consumables, like the sealing gasket and the silicon washer for the float valve, appear fairly generic on many off-brand models (made in the same Chinese factory?). As long as you match a part correctly, they seem to work.
I have seen some generic gaskets titled “For stainless steel pressure cookers.” I can’t say if that identifier is essential or just marketing.
What size pressure cooker should I get?
Stove-top pressure cookers come in all sorts of sizes. I have seen 2-quart, 4-quart, and even 10-quart electric pressure cookers, but they are usually 3, 6, and 8-quart units. American Test Kitchen suggests getting an 8-quart cooker because “you can always cook less in an 8-quart, but you can’t cook more in a smaller cooker. However, I disagree. My sister has an 8-quart electric for her 2-person family and would always make too much food in it. She got a 3-quart electric and is much happier. I often cook for five adults and have never had a capacity problem using my 6-quart cookers. For years, my mom used a 4-quart stove-top for a family of 7. However, when she made stew, she cooked the potatoes separately, and when she could, she eventually bought a 6-quart stove-top unit.
A 6-quart pot works in most situations and is the most flexible as it can accommodate relatively large amounts of cooking but can also easily cook smaller portion sizes. Remember that a pressure cooker can only be filled 2/3rds full, and some expanding/foaming foods like rice and beans should only be filled ½ full.
First Generation Pressure Cookers.
These stove-top pressure cookers have a simple design. Air is expelled from a vent on the oven’s lid. On top of the lid’s vent tube is a regulator of a calibrated weight. When pressure builds past 15 PSI, the weight is slightly lifted, and the excess pressure is released, causing the weight to rock. The process continues, causing the weight to “jiggle” back and forth. These pressure cookers are sometimes called jigglers because of this. Once the regulator starts to jiggle, the operator turns down the heat so that jiggling is relatively gentle. Timing starts once the regulator is rocking.
Advantages:
-A straightforward mechanism that has few moving parts.
-It is evident when the unit reaches pressure and if you need to readjust the heat to achieve gentle rocking.
-These cookers tend to be less expensive than generator-two pressure cookers.
Disadvantages:
-It is possible to lose the regulator.
-These units may lose a little more liquid in the form of steam than second-generation PCs.
-Some people find the rocking, accompanied by a swish-swish sound, scary.
-Unless you change the regulator, these units can only operate at one PSI (not a big deal).
This first-generation “jiggler” pressure cooker uses a weighted regulator that rocks open once the pot’s pressure exceeds 15 PSI. The arrow is pointing to the regulator.
Second Generation Pressure Cookers.
Second-generation stove-top pressure cookers use a spring-type regulator that doesn’t jiggle. Instead, these units hiss a bit (some more than others). They usually have an indicator that says they are under pressure and may have several pressure levels.
Like Generation-One units, you start on high heat, and when the indicator shows that the pot is under pressure, you lower the heat to maintain that pressure. For some cookers, you want to see a gentle stream of steam; in others, you are given a clear visual indicator that the pot is under proper pressure. Your pot’s instruction guide will tell you what to look for.
Advantages:
-May lose less moisture than Gen-One cooker.
-Quieter than a Gen-One cooker.
-Can often achieve several different pressure levels (not very important)
Disadvantages:
-May be more expensive than a Gen-One cooker.
-Some may prefer a Gen-One cooker’s clear visual and auditory cues.
Note: My mom’s 1940s Model 40 pressure cooker likely used a spring regulator, and her first jiggler was purchased in the 1970s, so I’m not quite sure why some experts labeled jigglers as “first-generation.”
This is a second-generation stove-top unit. The arrow points to the regulator, which does not jiggle. The arrow points to the “float valve.” As the pressure builds this valve will pop up sealing the pressure cooker and locking the lid as a safety feature.The float valve has popped up in this photo, signaling that the cooker is sealed. Now, you need to wait until a steady stream of steam comes out of the regulator (see next photo).Looking carefully, you can see a stream of steam coming out of the regulator. Once this happens, lower the heat until you see a gentle but steady stream of steam. This is when you start your time.This Kuhn Rikon pressure cooker emits very little steam. Instead, you monitor the pressure indicator on the top of the lid. Once you move to the second red bar, lower the heat to maintain this pressure level. You can see that two bars have emerged.
Both Gen One and Gen Two Pressure Cookers:
Stove-top pressure cookers can last a lifetime.
They are high-quality pots that can be used as regular stockpots when needed. In this case, the cook leaves the regulator off/open on the pressure lid or uses a different lid. Some pressure cooker manufacturers sell a separate glass lid for non-pressurized cooking.
What can a stove-top pot do?
Cooks Soups/Stews/Tough meats: Yes
Has software programs for common foods: No
Set and (almost) forget operation: No
Slow cooking function: Yes (if used like a stove-top Dutch oven)
Make Rice: Yes (a favorite ability)
Make hard-boiled eggs: Yes
Make Yogurt: No
Sous Vide foods: No
Cook other grains: Yes
Make desserts like cheesecake: Yes
Can saute in the pan: Yes
Cook at 15 PSI: Yes (Many)
Can last a lifetime: Yes
Requires AC outlet: No
Third Generation Pressure Cookers.
Third-generation cookers are electric, the most obvious being the Instant Pot. However, the Instant Pot was not the first electric pressure cooker on the scene. The first electric cooker was introduced in 1991, and the Instant Pot came out in 2010.
I had a Nesco electric pressure cooker in the mid-90s that worked very well. My Nesco had typical pressure cooker functions and a slow cooker setting. The Instant Pot and its clones added a lower temperature setting to make yogurt and some simple timing programs for common foods, like stew and rice. The Instant Pot became a hit because it was featured on Amazon during a Black Friday sale. Robert Wang was wise to call the Instant Pot something different than a pressure cooker as that neutralizes Urban Legend explosion fears. People got intrigued by pressure cookers and didn’t even know it!
Advantages:
These pots offer set-it-and-forget-it capabilities. Press a few buttons, and the cooker will reach pressure for a set amount of time and then go to keep warm. In most cases, the operator is responsible for releasing pressure if indicated.
Disadvantage:
-Requires an AC outlet.
-As a small electric, the lifespan of a 3rd generation is limited.
-Many more components than a stove-top unit. Circuit boards, pressure sensors, temperature sensors, thermal fuses. The list goes on.
These pots typically cycle between 10-12 PSI, lower than a stove-top unit. Some smaller pots may have an even lower operating pressure. Only one electric pot, the Instant Pot Max, can achieve the standard 15 PSI. However, some reviewers noted that it didn’t cook any faster than typical Instant Pots, which are less expensive.
Sous Vide foods: A few machines (poor results reported).
Cook other grains: Yes
Make desserts like cheesecake: Yes
Cook at 15 PSI: Only one machine, the Instant Pot Max.
Can saute in the pan: Yes
Can last a lifetime: No
Require AC outlet: Yes
I have used this Mealthy pressure cooker for 6 years. Prior to that I used a Nesco electric pressure cooker since the 1990s. The Nesco’s regulator was damaged, making the unit inoperative. Electric pressure cookers operate differently than stove-top units. They may build to 15 PSI but then cycle between 10 and 12 PSI during cooking. This lowers their cooking temperature, so they cook a bit slower than stove-top units—image from hippressurecooking.com
Hybrid Machines
A few pressure cookers on the market combine their pressure cooking function with a convection oven (air fryer). This allows the user to cook food rapidly under pressure and then brown/crisp it. People who have these machines generally like them. However, they can be bulky and more expensive.
Several companies make hybrid pressure cookers that can also act as air fryers. This allows you to cook something and then brown it quickly. This is the original Ninja Foodi.Another view of the Foodi. The pressure lid is on the pot. You can also see the air fryer lid permanently attached to the cooker.
Conclusions/Recommendations
A pressure cooker is a fantastic and safe cooking gadget. It saves fuel, gets meals on the table 3-10 faster than conventional methods, preserves vitamins, and the food tastes great because all of the volatile aroma molecules are preserved. Meats come out juicy and tender. Vegetables have more vitamins, and rice, beans, and grains cook quickly. You can make entire meals simultaneously without blending flavors with the pot-in-pot technique. These pots will save you time and money; they use little energy while allowing you to cook cheaper cuts of meat.
The American Test Kitchen suggests buying a stainless steel cooker with a broad base for durability and quick sauteing of foods. This is good advice, but you can certainly use an aluminum cooker with excellent results. I have pressure cookers with typically sized bases and may have to brown large amounts of stew meat in two batches. I’m not working in a commercial kitchen, so super durability and saving 5 minutes of browning time are not crucial.
Stove-top pressure cookers offer the advantage of cooking at a full 15 PSI (faster cooking times). They can last a lifetime, be used as a high-quality stock pot, and be operated using many heating sources, from kitchen ranges to camping stoves. They are the perfect cooking tool in a disaster situation. A cooker from Generation One or Generation Two cooks similarly. Remember, if a cooker operates at the same PSI, it will cook the same.
However, I suggest getting an electric pressure cooker for the first-time user. Their ease of use and automatic nature make you more likely to use them. Additionally, dozens, if not hundreds, of websites and YouTube videos make it easy to get up and running.
Hybrid cookers are loved by their owners due to their additional versatility. However, that additional functionality may make an already daunting task even more difficult for a new user. Such an appliance can be purchased later if desired.
Which type of cooker do I use? The answer is “Yes.”.
I recently came across a Yale Environment Review article that stated, “Cooking accounts for 20% of consumers’ energy use.” This percentage surprised me as I thought the energy used in food preparation was nominal. It got me thinking about appliances and their energy use.
I thought my information quest would be pretty simple if I did a Google search, but I was wrong. I came across blogs, environmental websites, an electric power cooperative website, and even government-run environmental websites; they all got it wrong. I’m not trying to be grandiose, but my conclusion was correct.
If I queried, “How much energy is used by a toaster oven?” All of the sites would say something like:
“Look at the device’s back panel for the wattage used and then multiply this number by the time in hours that the appliance was in use to find the appliance’s efficiency. Let’s say the toaster oven’s label says it uses 1500 watts, and you bake something for 90 minutes (1.5 hours). The energy would be 1500 x 1.5 = 2250 watt-hours of energy.”
This formula is utterly wrong, and it shocks me that so many authoritative sites use it.
When vetting appliances for the solar-powered, all-electric kitchen in my camper van, I had to figure out how much power an appliance used to determine the size of the battery system I needed. The most significant energy draw in the van was cooking appliances that heated food, like my induction burner. I needed to know if I could practically power them with my solar/battery set-up. To do this, I used a Kill-A-Watt meter. This device plugs between the appliance’s power cord and the wall outlet. It provides a wealth of information, including the watts the appliance uses at any moment and the total amount of watts/hours used for a given period measured in kilowatt-hours (kWh).
I knew that an appliance’s actual wattage usage is often less than stated on its back panel, and sometimes, this difference can be substantial. I also knew many appliances don’t continuously operate at full power. Many devices that heat up use a thermostat or other sensor to control the power output. For example, my van’s induction burner is rated at 1800 watts, but it has never drawn more than 1500 watts, and at lower power levels, it only draws 600 watts intermittently.
I continued my search and found YouTube videos that measured the power used instead of calculating theoretical numbers. The most eye-opening one was from the channel “Under the Median.” They did a practical test cooking the same food in their wall oven, a toaster oven, a slow cooker, and an electric pressure cooker to see which was most energy efficient. Their results surprised them, and they surprised me, too. Naturally, their wall oven used the most energy; most electric ovens use between 3 and 5 kilowatts when the heating element is on. They were using their personal appliances, and due to a malfunction, a given appliance may have been using more power than it should. However, per their results, their toaster oven was more energy efficient than their crock pot. What! I had to investigate further.
Our toaster oven is a Ninja Foodie with a stated wattage of 1800 watts. It is relatively small compared to other toaster ovens, which should make it more efficient (it has less space to heat up). It also features a 60-second preheat, much less than my regular oven, which takes over 10 minutes to preheat. I did a one-hour test at a standard 350F (177C) and monitored the Foodie’s power usage using a Kill-A-Watt meter.
If I had used the standard (and incorrect formula), I would expect that the Foodie would use 1800 watt/hour (1800 watts x 1 hour = 1800 watt/hour). However, that was not the case. These were my results:
60-second preheat operating wattage = 1600 watts
Baking element on operating wattage = 1300 watts
The oven cycled between 1300 and 2 watts as the thermostat regulated the temperature. It used 1300 watts around 34% of the time; the rest of the time, it required only 2 watts (likely to power the electronics).
The toaster oven used only 340 watts in one hour, not 1800 watts! If I were to make a pot roast in the toaster oven at 350F for 3.5 hours, the standard calculation would be 1800 x 3.5 = 6300 watt/hour used. However, the oven would have actually used 340 watts x 3.5 hours = 1190 watt/hour. That is a very significant difference!
I was intrigued as my results with my toaster oven were similar to the “Under the Median” results. The “Under the Median” video also noted a significant difference between the energy used by a slow cooker (CrockPot) and a pressure cooker (Instant Pot). I had several of these appliances. Would my results match theirs?
Limitations of my tests.
There are dozens of electric and stovetop pressure cookers and even more slow cookers. Naturally, I couldn’t test all of them, so please take my findings as generalities. Slow cookers and pressure cookers are most cost-effective when cooking foods like a tough pot roast. My experiment was to calculate the energy differences when cooking a pot roast. I tested six devices, but with the price of beef, I wasn’t going to cook six pot roasts. Instead, I used 4 cups of room temperature water as my “pot roast” in each device.
Things that can impact the energy used by a device include:
-The size/volume of the device’s cooking chamber.
-The watts used by the heating element.
-The level of insulation of the device.
-The temperature or amount of the food being cooked.
-The device’s computer’s programming, if it has one.
-Other heat losses include opening an oven door or lifting the lid on a slow cooker.
Different gadgets cook at different times; I used the following cooking times:
Slow cookers, 8 hours on low.
Electric pressure cookers (10-12 PSI), 1 hour at high pressure.
Stove top pressure cooker (15 PSI-cooks faster), 45 minutes at high pressure.
I used two different power meters and ran several cooking devices more than once. The two meters gave similar results.
Manual slow cookers (those with only a high/low/off switch) continuously apply power to a belt-like heating element around the pot’s base. A heat-retaining ceramic crock sits in the base and is indirectly heated by the heating element. The pot is designed so that the heat added eventually equalizes with the heat lost, resulting in a simmer (190F-210F) at the low setting. The high setting incorporates a second heating element in many of these manual pots, resulting in a final high temperature of around 300F for that setting. I did my tests with these pots set on low, as that is what most would do if they were cooking a pot roast.
Other devices, including newer automatic slow cookers/multi-cookers and electric pressure cookers, use a thermostat or other sensing device to regulate whether a heating element is off or on. This should be a more energy-efficient method of temperature control.
Stovetop pressure cookers operate similarly to a manual crock pot. In this case, the cook controls the heat applied to the pot, eventually finding an equilibrium point to maintain proper pressure. I did not have the equipment to measure the power used on my stovetop (hob) as it is a 220v device, so I used a 120-volt tabletop induction burner that I could measure using my Kill-A-Watt meter. I used the burner at full power to reach pressure, then turned it down to a power level of 2.5 out of 10 to maintain pressure.
Here are my results from worst to best energy use:
These appliances are vastly more energy efficient than using an oven for simple meal preparation. We are looking at good to excellent energy efficiency.
My daughter’s college crock pot. Seven quarts? Large enough for a party or big family.
Fifth Place
Seven Quart Manual CrockPot
Stated Wattage: 270 watts
Actual Wattage Use: 204 watts (continuously on)
Final Temperature of contents: 200F (93C)
Time in operation: 8 hours
Total energy used: 1.64 kWh (1640 watts)
I’m a huge fan of this Instant Pot Dutch oven. It is a versatile and competent cooker.
Fourth Place
Six Quart Instant Pot Dutch Oven Multicooker (basically an automatic slow cooker)
Stated Wattage: 1500 watts
Actual Wattage Use: 886 watts (intermittently on)
Final Temperature of contents: 206F (97C)
Time in operation: 8 hours
Total energy used: 1.2 kWh (1200 watts)
Note: The toaster oven set at 350F for 3.5 hours would have used the same energy!
I bought this little crock pot for $9 over 40 years ago when I was a struggling, divorced resident physician. It has served me well, making me hundreds of unattended hot meals.
Third Place
Two and a Half Quart Manual CrockPot
Stated Wattage: 75 low/150 high watts
Actual Wattage Use: 69 watts on low (continuously on)
Final Temperature of contents: 190F (88C)
Time in operation: 8 hours
Total energy used: .534 kWh (534 watts)
This Kuhn-Rikon stovetop pressure cooker could last a lifetime with proper care.
Stated Wattage: 1800 watts for the induction burner
Actual Wattage Use: 1443 watts to reach pressure, 600 watts intermittently to maintain pressure.
Time in operation: 45 minutes (15 PSI, cooks faster than electric pressure cookers)
Total energy used: 0.43 kWh (430 watts)
I have used this Instant Pot clone for many years.
First Place Tie
Mealthy 6 Quart Electric Pressure Cooker
Stated Wattage: 1000 watts
Actual Wattage Use: 886 watts to reach pressure, then cycled to maintain pressure.
Time in operation: 60 minutes (10-12 PSI a bit slower than stovetop PC).
Total energy used: 0.20 kWh (200 watts)
My sister’s electric pressure cooker.
First Place Tie
Fagor 4 Quart Electric Pressure Cooker
Stated Wattage: 800 watts
Actual Wattage Use: 750 watts to reach pressure, then cycled to maintain pressure.
Time in operation: 60 minutes (10-12 PSI a bit slower than stovetop PC).
Total energy used: 0.21 kWh (210 watts), virtually the same as the Mealthy unit.
Conclusions
Using a small electric cooking appliance is energy-saving. My experiment and the one conducted on the YouTube channel “Under the Median” suggest that, in some cases, a toaster oven can be as energy-efficient as a large slow cooker when cooking something that requires a longer cooking time. That was surprising.
The Instant Pot Dutch Oven uses a thermostat to regulate its slow cooking temperature. This makes it more efficient than the 6 Quart Manual CrockPot, which uses low power continuously.
There was also significant energy savings when comparing the large CrockPot with its 2.5-quart sibling. You don’t need a slow cooker of every size, but a smaller one will save a few energy pennies if you are a small family or a group of one.
The pressure cookers were outstanding in their energy efficiency. They require a lot of power to reach pressure (about 10 minutes at high power in my experiment), but then they barely sipped power, turning on the heat in 10-second bursts to maintain pressure. Naturally, you will see the most prominent energy savings when cooking something longer. If you cook something under pressure for 1 minute, the cooker still will take 10 minutes at full power to build pressure before it starts the 1-minute countdown.
Stovetop pressure cookers may or may not use more energy than electric ones, as my experiment couldn’t use a hob and had to rely on a lower-powered 120-volt induction burner. Still, they are very efficient and generally cook faster than an electric pressure cooker.
Different foods require different cooking methods. Slow cookers and pressure cookers cook with wet heat, while toaster ovens and regular ovens use dry heat. Use the most suitable process for the food you are cooking. You can improve the efficiency of a toaster oven or regular oven by using the recipe’s regular cooking temperature and the oven’s convection fan (if available). The fan can reduce cooking time by 25%, saving you money.
Should you ever use your regular oven? Of course! Regular ovens regulate temperature better than most toaster ovens and have more capacity. Beyond Thanksgiving dinner, think about making several layers of a cake or trays of cookies at once. Additionally, think of cooking an entire meal in the oven. It takes no more energy to cook an entire meal in an oven vs. a single item. For some foods, you can turn off a regular oven up to 10 minutes before the food is done. Regular ovens are well-insulated and will retain heat for a while after they are turned off.
Ultimately, if you tailor the foods you make correctly with the most appropriate appliance, you will save the most energy. Where I live, a kWh costs $0.13, which isn’t too expensive, but pennies add up. In the UK, electricity is around 25 pence/kWh. In other countries, it is even more. I saw one Reddit post where someone in an unnamed country said that energy prices are increased sixfold during peak usage times (4 -8 PM) as most people are making dinner then. Wow!
Remember, cooking energy is 20% of your total energy bill. Anything you can do to reduce it is worth your time. I was so impressed with how energy-efficient pressure cookers are, I decided to do a deep dive into the topic. Stay tuned.