Dear daughter, how exciting that you picked up an Instant Pot on Black Friday week, and what a great price you got! You asked me to gather my recipes, but many are in my head. Also, I usually use the Internet and YouTube when I am making something new. Naturally, I’ll be happy to teach you any tricks I know, but it is easier for me to do so recipe by recipe than to compile a book, as I tend to “cook on the fly.”
I decided to take a different route and document the fundamentals of pressure cooking, as I believe that understanding the background and theory of something makes adaptive solutions come more easily. I also decided to do this in a post, as it can serve as a permanent reference for you, and it may help someone else who picks up an electric pressure cooker/Instant Pot over the holidays. Let’s get started!
History
Pressure cooking has been around for a very long time, but became available for home cooks in the late 1930s. Several pressure cookers were introduced then, but the one that took off was presented at the 1939 World’s Fair by the now Presto Corporation. It was more popular than a slightly earlier offering as it was easier to use.
People went wild for pressure cookers, which cooked much faster than traditional methods, and they flew off the shelves. However, WWII happened, and production of pressure cookers took a back seat to war production.
After the war, demand for pressure cookers was high, and a number of companies began manufacturing them. However, many used inferior materials or designs. This is when stories began circulating about “exploding bombs” in the kitchen. However, modern pressure cookers have multiple safety features and are very safe if used correctly.
Traditional stovetop pressure cookers have been around since then, but lost popularity when new gadgets, like the microwave oven and slow cooker, became popular in the 1970s and 1980s.
Consumer electric pressure cookers were introduced in the early 1990s, and the first Instant Pot was sold in 2010. It was a hit, as Amazon featured it during a Black Friday sale. The Instant Pot is just an electric pressure cooker with some additional programs. However, it launched the recent pressure-cooking craze.
There are now many clones of the Instant Pot. They all do similar things, but you may find that one’s feature set is more desirable than another.
My mom
Dear daughter, you never met my mom, but she was a great cook. She used a stovetop pressure cooker several times a week and made the most amazing dishes with it. That is why I’m so comfortable using a pressure cooker. I know you have seen me use our pressure cooker often, so I hope that experience was a good vibe for you, too!
How pressue cookers work
A pressure cooker is a sealed pot with a vent tube. When water boils, it creates steam in the pot, which pushes out the air through the vent tube. The pot then closes the vent and pressurizes (15 PSI for most stove-top units, 10-12 PSI for most electric units). Higher pressure allows water to boil at a higher temperature. For example, at sea level, water boils at 212°F, but at 15 PSI, it boils at 250°F.
Additionally, the steam in the pot eliminates the micro-air gap around foods. This combination allows food to cook much faster, often three times faster than by conventional methods. This method can also tenderize tough meats and cook dry beans without soaking. It does the above not only more quickly, but it also preserves flavors and vitamins.
The difference between stovetop and electric pressure cookers
Stovetop pressure cookers in the US operate at around 15 PSI, while electric pressure cookers range from 10-12 PSI. This means they will reach a lower operating temperature, so it will take slightly longer to cook something. This is usually not a big deal, but it has to be taken into account when using recipes, as some are written for stove-top units while others are for electric units. This difference is insignificant when the cooking time is short. It is more significant when cooking time is longer, as you may need to add 5-10 minutes to the suggested cooking time when converting a stove-top recipe to an Instant Pot recipe.
However, because the Instant Pot is so popular, there are numerous cookbooks and thousands of recipes on the Internet for electric pressure cookers, so it is always easy to find a recipe that suits your needs.
Lastly, since stove-top units are basically heavy-duty pots, they can function for decades. Your aunt, Nancy, used my mom’s 1950s pressure cooker into the late 1990s, until it was accidentally destroyed. You can’t expect that longevity from an electric appliance. However, you can still expect your Instant Pot to work for many, many years if you take care of it.


Do you need all of those functions?
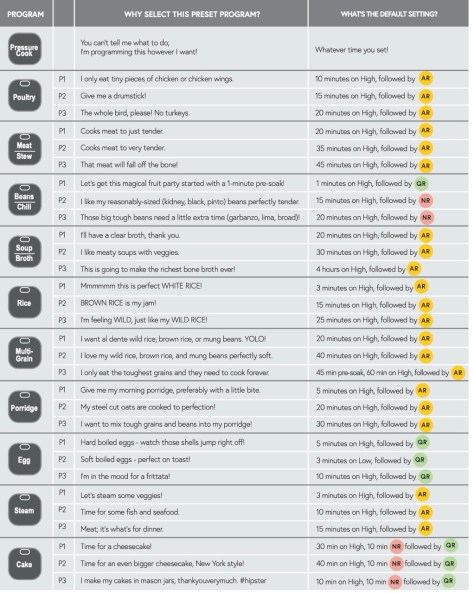
Various Instant Pot models have different numbers of functions, but most are unnecessary and unused. I always set my times using the manual function. However, there may be some functions that could be useful.
Sauté: When you brown your meat or saute your vegetables, they release more flavor. Having a Saute function lets you do this right in the pot before you pressure cook. I often use this function. This is an unpressurized function.

Slow Cook: Most say a slow cooker does a better job than an Instant Pot set to slow cook. However, most electric pressure cookers have this function, which can be used in a pinch. This is an unpressurized function.
Egg/Rice functions: Many swear by making rice in an Instant Pot. You can also pressure steam eggs for perfect hard-boiled eggs. You don’t need a separate button to do these things; you can just manually set your pot. These are pressurized functions.
Yogurt: You can use your Instant Pot as a lower-temperature incubator to ferment yogurt. This function works well. This is an unpressureized function.
Sous Vide: You can program your Instant Pot to act as a water bath for sous vide cooking. However, many pots are only 6 quarts, and most sous vide enthusiasts would use a dedicated heater and a larger water bath. However, this function could be useful when cooking for one or two. This is an unpressurized function.
The bottom line is that most don’t need all of the functions, so don’t worry if you have fewer functions on your model compared to some other model. However, if you have a particular, unique need, perhaps you want to make your own yogurt, then look for those unique options.
What size pot is best?
I know you have a 6-quart pot, and that is the perfect size. However, electric pressure cookers come in many different sizes. With that said, I believe the 6-quart size is the most versatile for most people.
Pot-in-pot cooking
You can buy smaller cooking vessels that fit inside your main pot. These allow you to cook several different foods at once. I have been interested in trying that, but have not yet. However, it sounds interesting.
The “Burn” warning
If you don’t have enough liquid in the pot, or if the liquid is too thick, you may get a “Burn” warning. This means that the pot is overheating and won’t operate. Some recipes will tell you to add water/broth first and not mix the contents to avoid this.
Immediate release of pressure vs. release naturally
Some recipes will tell you to release immediately, others will ask you to release naturally.
When cooking delicate foods, you release the pressure immediately to halt cooking. When cooking other foods, like meats, you let the pressure drop naturally, as this keeps the meat juicier and less dry.
When the recipe tells me to release naturally, I usually unplug the pot after cooking time, as the “keep warm” setting may prolong this process. If the pressure hasn’t dropped in 10-15 minutes, I’ll usually release the pressure myself. For me, that is a good time vs. results compromise.
Thickening soups, stews, and sauces
You know I like soups and stews a bit thicker. If I need to thicken after cooking, I plug the pot back in and use the sauté function to bring the liquid back to a boil, then add my thickening agent. I can then cancel and go to “keep warm” or simply unplug the pot if I’m serving immediately.
Using the instruction manual
The instruction manual that came with your Instant Pot will have all sorts of useful information. Additionally, it will supply you with cooking timetables. How long to cook pork chops? Check the manual! What about black beans? Same, check the manual. It is a good idea to keep that booklet handy!
Care of the device
My mom’s pot used a fragile rubber sealing ring, but new pots use much more durable silicone rings. I always pull these out and wash them separately. This can be done by hand or by placing them on the top rack of the dishwasher.
Please don’t store the pot with the gasket in and the lid closed. This will result in a smelly pot (remember your microbiology) and a squashed sealing ring that may not hold pressure. I always store my ring loose in the pot and install it into the lid at cooking time.
Rings will absorb food odors. If you plan to make many sweet and savory dishes, consider having both a savory and a sweet sealing ring. These rings are inexpensive and can be purchased from many places, including Amazon. Make sure you get the right ring for your particular pot, since they do come in different sizes.
You can wash the inner pot and the sealing ring (top rack only) in your dishwasher. However, the lid and regulator should be hand-washed. Naturally, the base should never be washed. Use a damp cloth to clean an unplugged unit.
How energy efficient is an Instant Pot
It’s good that your sciency dad likes to delve into such things. A while back, I experimented to determine just that. I tested several electric pressure cookers, a stovetop pressure cooker heated by an induction burner, several different sizes of crock pots, and a toaster oven. All were significantly more energy-efficient than a traditional oven, but that is no surprise. What was surprising was that the electric pressure cookers were considerably more efficient than the other appliances, including the slow cookers.
Slow cookers sip electricity, but the classic ones are constantly sipping. A pressure cooker uses a lot of energy to reach pressure, but then it rarely uses energy to maintain that pressure. The stovetop pressure cooker was also very efficient, but the electric one still beat it. However, either would be excellent in situations where you needed to conserve electricity. That is the case when I’m camping in my all-electric adventure van as I rely on batteries and solar panels to cook.
When I did my experiment, I assumed that I was cooking something that needed longer cooking, like a stew. If I were cooking something that only needed a few minutes of pressurized cooking, the pressure cooker would be less efficient, as it often takes 5-10 minutes on full power to reach pressure. A long cooking time offsets that initial energy use.
If my goal was to conserve energy, I would cook foods that require a long cooking time in a pressure cooker, but I would cook foods that require a short cooking time on the stove or in the microwave. Lastly, I’m not trying to be disrespectful of the humble slow cooker. It was relatively energy efficient, and it certainly has its place as a functional cooking appliance.

What can I cook in an Instant Pot
An amazing number of foods! If you can cook it in a slow cooker, you (most likely) can cook it in an Instant Pot, just much, much faster. Stews, soups, dry beans, rice, tough meats, etc.
You can also make dishes like one-pot spaghetti and steamed cakes, including cheesecake.
As you know, I have made many different things in our pot, ranging from countless soups, curries, and stews to St. Patrick’s Day corned beef and weekday stuffed peppers. The great thing about an Instant Pot is that it is a “set and forget” (sort of) device. Always be within earshot when using it, but you don’t have to monitor it as closely as a stovetop unit. The Instant Pot will reach pressure, cook, and then turn to keep warm all on its own.
Are all pressure cookers the same? What about a different brand electric pressure cooker?
Dear daughter, I know you have an Instant Pot, so I’m writing this section for others who may be reading this post. My electric pressure cooker is not an Instant Pot, but it works just like one.
Different machines may offer slightly different programs or features, but most don’t make much of a functional difference. The only features that may be important to some are the yogurt, slow cook, and sous vide functions, as they could be slightly different or absent on some machines. All machines have a sauté function, which is important.
Different machines may offer other options that the end user may or may not want. Most Instant Pots have a stainless steel cooking pot, while some other brands have a non-stick one. Some pots may have a broader base or locking handles for the inner pot. Additionally, different pots may have various types of knobs or switches to release the pressure. You will adjust to your particular pot as they all work well enough.
Remember, US stovetop pressure cookers use higher pressure, so cooking times will need to be slightly reduced when converting a recipe from an electric pressure cooker to a stovetop unit. Little conversion is needed for recipes that have short cooking times, but times may need to be shortened for longer cooking times. For instance, an Instant Pot recipe that calls for 60 minutes at high pressure may only need to be cooked for 50 minutes using a stove-top pressure cooker.
What about brand-X pots
When it comes to electric pressure cookers in the US, they are more similar than different. As far as I know, the vast majority of electric pressure cookers cycle between 10 and 12 PSI, so they will cook the same way as an Instant Pot.
Stovetop units made in the US operate at 15 PSI, but some European ones operate at lower pressures, often 12 PSI. This is similar to an Instant Pot, so cooking times would be the same. European stovetop brands with a strong presence in the US sometimes convert their pots to 15 PSI for the US market, so read the instructions that came with your pot.
Stovetop Chinese brands seem to be more variable, with some operating at 15 PSI and others as low as 8 PSI. If you decide to go with one of these pots, make sure you know its cooking PSI, as there is a significant difference in cooking times between 8 PSI and 15 PSI.
Conclusion
Dear daughter, it is great to see you embrace cooking from home. Pressure cookers are truly miraculous machines that can transform tough cuts of meat to tender morsels and speed up dishes that would typically require all day to less than an hour. I know you will master your Instant Pot in short order. For those other readers, I hope that this open letter has helped you understand this excellent device.
Dear reader. My daughter picked up an Instant Pot during Black Friday week and asked me for some recipes. I decided to do a post instead, as she could use it as a reference, and it may also help other newbies. The above is that post.
Images are my own or from the Mealthy Instruction Manual. All images are used for educational and entertainment purposes only.