
Tag Archives: #homemade bread

Save Money: Let’s Make Some Homemade Bread

I went to make some toast this morning and discovered that we were out of bread. No problem, I’ll just make some. Now, you may be thinking that making bread from scratch would be an all morning operation, however, the whole process is only going to take me around five minutes actual work.

If you have seen some of my other posts you know that I’m a big fan of bread makers, and I have more than one. I usually find them at thrift shops and I have bought working bread makers for as little as $4.99.

Today, I’m going a bit upscale and using one of my Zojirushi bread makers. These are considered the best of the best, and they have a price tag to go along with their title. New versions of this bread maker sell for around $455, with the ceramic non-stick version commanding an eye watering $500! Used Zojirushi machines also are resold at a very high price, but I was fortunate to get a deal as my used machine has a dent. It doesn’t impact its performance, but it does impact its resale value. I paid $70 for this classic gadget.

If you want to enter the world of easy bread making you don’t have to spend that much. I have purchased a number of bread makers for less than $15 at thrift shops and they all make a nice loaf. Why do I have more than one bread maker? I’m just a chronic comparer who enjoys playing with different machines.

It takes me about 5 minutes to pull and measure the ingredients to make a loaf. I do check on the dough very early on in the mixing process too. However, everything else is automatic from mixing, to kneading, to baking. It is a super easy process.

Today’s recipe is from Betty Crocker. Naturally, I have modified it a bit, and you can see my changes in the photos below.

I have a couple bread maker cookbooks, but you can find hundreds of recipes for free just by searching the internet. The reason I like cookbooks by Betty Crocker and Better Homes and Gardens is they are well tested and it is likely that they will make a delicious loaf.

You may ask why I make my own bread? It is simple:

-What smells better than bread baking?

-I produce a premium loaf for next to nothing in cost.

-I can modify my loaf in many different ways.

-I can make other types of bread, like hamburger buns, hotdog buns, or pizza dough that are significantly better than the store-bought stuff.

-Beyond regular white bread I can easily make whole wheat, rye, cheese bread, Sally Lunn, herb bread, dill bread, raisin bread, and many many other types of bread.

Let’s take a look at the recipe:

Here is the simple recipe. On the left are the ingredients for a 1.5 pound loaf, and on the right are the ingredients for a 2 pound loaf. I’ll be making a 1.5 pound loaf today which resembles a typical loaf. The two pound loaf would be much taller. Excuse my sloppy numbers, they indicate the ingredients in grams. It is much easier and faster to weigh ingredients, and it is more accurate too. You can buy a food scale for less than $10 and it will useful for many other recipes and kitchen tasks.

Here is the baking pan minus the kneading paddles. I like to spray a little cooking spray on the shafts, as it can be hard to remove the paddles if you don’t do this. This particular machine has two paddles, but most others have just one and they work well too.

I added the softened butter and I’m starting to pour in the water. I’m doing this by weight, adding 236 grams of water. Our water is heavily chlorinated, which slows down the yeast, so I’m using the filtered water from the fridge which I then warm to a “baby bottle” temperature in the microwave. Too hot, and you will kill the yeast. Too cold, and the yeast wont grow fast enough.
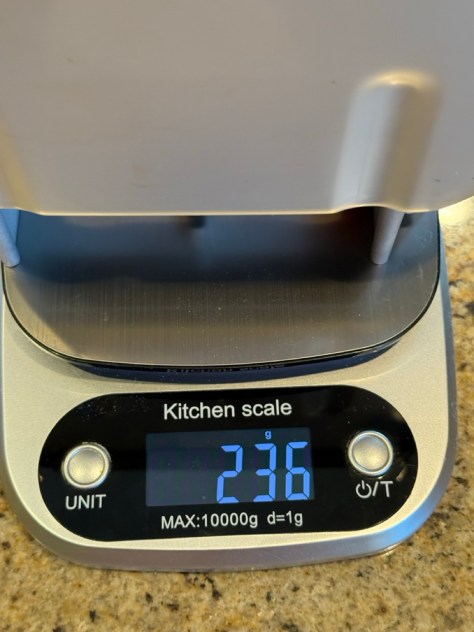
You can see that I got the water measurement just right. However, when dealing with weights over 50 grams a few grams one way or the other won’t make much of a difference.

After I measure each ingredient I hit the “T” button which tares the scale back to zero making measuring the next ingredient easy.

Next, I add the flour. I need 360 grams. It looks like a half of a spoon more will do. I keep this spoon in my flour canister. By the way, I’m using bread flour which has a bit more gluten than standard AP flour. You can buy bread flour inexpensively at Costco, and also on Amazon. Naturally, most grocers also sell it, but it will cost you a bit more. A 5-pound sack has around 21 cups of flour. Since this recipe uses 3 cups of flour a sack could make up to 7 loaves.

This recipe calls for 3 tablespoons of powdered milk. I measured this by weight. Many products give a weight measurement on the Nutritional Facts panel. In this case 1/4 cup is 23 grams in weight. Three tablespoons is 3/4 of this amount, so 23 grams x 0.75 is between 17 and 18 grams. I’ll use 18 grams of powdered milk for this recipe. You can also find volume to weight conversions on the internet. They are usually in grams, making measuring even easier. Most food scales can be switched between Imperial units (pounds/ounces) and metric units (kilograms/grams). In goes the powdered milk.

When it comes to the salt and the yeast I use standard measuring spoons. They weigh very little and I don’t think my scale is super accurate with tiny amounts. Always level off your measuring spoons for the best results.

I buy yeast in a block as it is much less expensive than those little envelopes. I always keep my yeast in the freezer. Doing so it will stay active for a very long time. I started to use this batch of yeast almost a year ago and it is still good.

I’m going add some of my own extras to this recipe. I’m adding around 2 tablespoons (roughly) of ground flax seeds. The fax seeds add fiber, Omega 3 FAs, and antioxidants, plus they add a nice flavor and a homey look.

I’m also adding 1 tablespoon of instant potatoes (dry). The flakes hold onto water and will keep my bread fresher a bit longer. Remember, this bread has no preservatives. It will dry out much quicker than a commercial loaf. If you eat just a little at a time, freeze the remainder. I keep mine in a breadbox and it is good for up to three days, and toastable for a day or two after that. Note that I keep the salt and yeast in separate corners of the pan. Salt can kill yeast if too concentrated.

The pan goes into the machine, I press a button or two, and I’m almost done. Total time to measure the ingredients? Around five minutes.

There is one more important thing to do. I use a spatula to knock down any errant flour off the sides of the pan. After the dough has been mixing for a few minutes I check to see that it has formed a slightly sticky (to touch) ball. If it looks too dry and raggy I’ll add water one tablespoon at a time until it looks like the above. If it is too loose/wet and not forming a proper ball I’ll add flour one tablespoon at a time until it looks right. This is an important step. If you weigh your ingredients you will make no adjustment or only minor adjustments.

I walked away and did some other tasks. After a few hours I started to smell the delicious aroma of bread baking. A bit over 3 hours from the start and I had this wonderful loaf. Bread for pennies? Even more important now that inflation is out-of-control.

Making bread is a fun hobby, and I have been baking bread for at least 40 years. I have used a food processor, a mixer, and bread makers. All have their advantages and disadvantages. However, when it comes to simplicity and ease you can’t beat a bread maker. We will be enjoying this loaf for the next few days. When it is used up I’ll simply make another one. And, yes, it tastes so much better than that stuff that is wrapped in plastic at the grocery.

Peace

Mike

Save Money: Bake Your Own Multi-Grain Bread!

In a recent post, I discussed rediscovering my long-neglected bread maker. In reality, I have several bread makers, as you can buy used ones for very little. I love to compare gadgets.  That is just me.

It was very inexpensive for me to make bakery-quality white bread using simple, readily available ingredients.  The bread was delicious, but my wife believes that white bread isn’t as healthy as other types of bread, and so I’ll try baking a multi-grain recipe.  Today I’ll be using a 20-year-old Zojirushi bread maker using the whole wheat setting.  It is very likely that the following recipe will work with any 2 pound bread maker that has a whole wheat cycle.

Don’t have a bread maker?  Shop second-hand stores or Facebook Marketplace.  You can buy bread makers for less than $10 at secondhand stores, and I have seen many in the $10-$30 range on Facebook Marketplace.  

Just a few bread makers that I saw on Facebook Marketplace.

The least expensive bread makers have a loaf pan that is more vertical than horizontal. The bread will taste the same; it just doesn’t look like a traditional loaf.  If you cut the bread perpendicular to the pan, you will get nice “sandwich-style” slices. Horizontal loaf pans make more traditional loaves, but the slices are pretty tall.  I’m using the Zojirushi today, because its two-paddle, long-pan design produces a horizontal loaf similar in size to the bread you buy in the store.  

If you buy any machine second-hand, make sure that the bread pan and paddle are included.  Plug the machine in and check to see if it powers up and the buttons work.  The majority of machines will work if they don’t look abused, come with a pan/paddle, and power up. I think you are best off with a machine that makes a 1.5- to 2-pound loaf.  However, one-pound machines will work too if you are a small family. Making a 2-pound recipe in a 1-pound machine will result in a mess, so make sure that you use a recipe sized for your machine. Often, you can download the instruction manual for your particular machine, which will include many recipes.

The loaf that I’m making today is from the Zojirushi instruction manual.  There are whole-wheat versions of multi-grain bread that can be found on the internet, but I thought I would start with a recommended recipe before attempting an internet recipe.  It makes a two-pound loaf.

This is the recipe that I used. Please make sure that you add the ingredients in the order listed for optimal results. This machine uses active dry yeast for regular cycles. However, some machines may require instant/bread-making yeast. Check your manual.

Like everything else, bread prices are rising steadily due to inflation and the Trump tariff taxes.  There are reports online of people spending $8 to $10 on a loaf of bread.  I’m in Chicago, and we are not that high as of November 2025.  However, multi-grain breads are still pretty pricey.  A Brownberry 24-ounce multi-grain bread is going for $4.99, and a half loaf of Lewis 12-ounce bread is $3.79 at my local store.

$4.99 for 24 ounces, and that is the sale price!
$3.79 for only 12 ounces of bread!

The multi-grain bread that I’m making today is 2 pounds, or 32 ounces.  I sourced the ingredients from Amazon, Costco, and my local market.  I did try to get good prices, but I would have saved significantly more if I had bought some ingredients, like the bread flour and 7-grain cereal, in bulk.  

Making the bread was beyond simple and took me less than five minutes to put together.  A few button presses later, and the machine took care of the rest.  It truly is a set-it-and-forget-it operation.  I buy my active yeast in a two-pound bag from Costco.  It is very inexpensive when purchased this way.  I keep it in the freezer for future bakes.  The only addition that I made to the recipe was ½ teaspoon of diastatic malt.  I read reports noting that a tiny amount of this ingredient helps the bread rise.

The only addition that I added to the recipe was 1/2 teaspoon of diastatic malt, which helps with texture and rise.

Here is a cost breakdown based on price per ounce of bread:

-The 12-ounce Lewis bread costs: $3.79   Almost 3 x more than homemade

-The 24-ounce Brownberry bread costs: $4.99 (on sale!) Almost 2x more than homemade

-My 32-ounce bread maker bread cost was only $3.60

It is not only more accurate to weigh your ingredients, but it is also faster and involves less cleanup.
All it takes is a few clicks, and the machine does everything else. I had to run some errands, and the bread was done when I got home.
Bread machines mix, knead, proof, and bake bread automatically.
A few beeps lets you know that it is bread time!
A beautiful loaf. Let it cool until it is barely warm; otherwise, you will rip the bread apart.
A crispy crust and soft interior. What more could you want? How about that it is significantly less than store-bought!

You simply can’t beat the quality and cost of homemade bread made with a bread maker.  The varieties of bread that you can make are endless, and it is possible to buy a used machine for next to nothing.  Why not give it a try!

Peace

Mike

images are my own or screen captures of images on websites. All are used for educational purposes only.

Save Money, Make Inexpensive And Delicious Bread Machine Bread!

This is another in my series on saving money on groceries while improving your dining experience. 

As inflation and the Trump tariff taxes continue to push up prices, it makes sense to find ways to stretch your food dollars.  Making your own bread is not only less expensive than store-bought bread, but it also tastes better and can be customized to your needs. Like thicker or thinner slices?  No problem., Sick of the outrageous prices of gluten-free bread?  Make your own. Desire a specialty bread for a special meal?  Absolutely!

My wife made a run to the grocery store and was happy that Ezekiel Bread had been restocked.  However, she wasn’t pleased when she realized that a small loaf was now ten dollars. She didn’t buy the loaf.

Bread is the staple of life, and just about every culture has some form of bread.  Bread is considered a subsistence food that provides the calories, vitamins, minerals, protein, and fiber necessary for life.  

When I was growing up, my mother bought “Silvercup” bread, which was one step above “Wonder Bread.”  It was good for sandwiches, but likely not the best in terms of nutrition.  We also bought bread from our neighborhood bakery. What a difference that bread was.  I have fond memories of walking into that place and being welcomed by the scent of freshly baked bread.  I remember, with fascination, the clerk taking a fresh loaf, pushing it through a slicing machine, and then deftly shoving it into a waxed bag.  That bread was the best.

My grandmother made most of her family’s bread, and it was delicious.  She made a light rye bread that was baked into a large, round loaf.  She didn’t buy yeast; instead, she would seed a new batch of dough with a portion of the dough she had saved from the week before.  I can’t imagine that she measured anything; she just knew what to do after baking thousands of loaves of bread by hand. Making bread was part of her life, and I’m sure it occupied at least one whole day of her week.

My mom would make yeasted bakery, but I don’t recall her making bread.  Most of her yeast bakes consisted of various filled coffee cakes, which we called kolaches, not to be confused with those delicious fruit-filled cookies called Kolacky.  

I’m not sure exactly when I made my first loaf of bread, but I started to make it regularly during my residency.  I was divorced at that time, and one of the few things that I took from that marriage was a large Cuisinart food processor, as my ex had no use for it.

I love machines, and the Cuisinart is one of them. I was determined to learn how to utilize every aspect of its capabilities, including its ability to knead bread dough.  I read somewhere that a flour company had a recipe book for “cool rise bread,” and I tracked down their address, which was in another state.  This was before the internet, so that task was more complicated than typing in a query in Google. I wrote them a letter..

A few weeks later, I received a nice note from the flour company, saying that they were surprised to hear from me, as their flour was not sold in the Chicago market.  However, they sent me the booklet and wished me well. I adapted their recipes for my food processor.

Cool-rise recipes were ideal for me at that time, as I could quickly mix and knead the dough in the food processor, then drop the dough into a couple of bread pans that I placed in the refrigerator, where they would slowly rise. Eight to 48 hours later, I would bake the bread at my convenience.  Having fresh bakery fresh bread as a poor medical resident was a tremendous morale booster. Typically,  I ate generic white bread that tasted like sawdust. 

When the bread machine craze hit in the 1990s, I bought a machine that made one-pound loaves.  I upgraded to a machine that made 2-pound loaves sometime in the early 2000s, and I still have that machine today. However, I eventually stopped using my bread machine, and I’m not sure why.

This bread machine is over 20 years old, and it still works!

As my kids got older, I would make bread for them as a treat; soon, they were helping me in the process. By then, I had graduated to a Bosch Universal Mixer, a tremendous mixer that could make six loaves of 100% whole wheat bread at a time.  It was great. However, the Bosch method still required work, and I no longer need six loaves of bread. 

My Bosch Universal Mixer can easily make six loaves of 100% whole wheat bread.
I rarely need this much bread now.
The bread made in the Bosch is fantastic, but it still requires some work.

During the pandemic, I was cleaning my basement and rediscovered my bread machine. Would it even power up after sitting dormant for years?  The answer was yes!.

I do most of the household’s cooking and make a lot of food from scratch.  I cook many combination foods, such as soups, stews, and casseroles.  These types of foods lend themselves well to a bread product, and I’ll often whip up something ranging from cornbread to a savory muffin.  However, nothing has quite the allure of the smell of freshly baked bread.

Humans have been making some form of bread for over 14,000 years, and it is possible to make bread with the simplest methods and ingredients.  Some people love the physicality of kneading dough, but I’m not one of them.  However, I love the taste of homemade yeast products, and that is where my old bread machine comes to my rescue.  I can toss in a few inexpensive ingredients, press a button, and a few hours later, I have a fantastic loaf of warm bread.

There are hundreds of bread recipes that can be made in a bread machine.  White, rye, wheat, fruited, nutted, egg-enriched, sweet, savory, you name it. I made a nice white loaf today.  What did it cost me for a 2-pound loaf of fresh, delicious bread?  Around seventy-eight cents, including the cost of the electricity. 

Bread machines are no longer trendy, so you can often get a used one at a second-hand store for almost nothing.  Just make sure that the pan and paddle are included and that it powers up when plugged in.  They are very durable, as mine is still running strong, despite being over 20 years old. Most electronic gadgets left in a basement for years would be out of commission. Mine is not an isolated case, as there are internet reports of others who are still using their bread machines decades after purchase.

In fact, I recently searched for bread machines on Facebook Marketplace and found many used models in the $10-25 range.  You can’t even go to McDonald’s for that amount of cash.  If you are interested, this is what to look for:

-Get a machine that makes between a 1.5 and 2-pound loaf

-Most prefer a traditional horizontal pan, but a vertical pan also works.

-Make sure that the unit comes with the baking pan AND the paddle. 

-Make sure it powers up when plugged in.

-You can find recipes on the internet, and you can likely download your particular machine’s manual/recipe guide from the manufacturer’s website.

Many new bread machines sell for under $100, but top-of-the-line machines, such as those from Zojirushi, cost hundreds.  Zojirushi is considered the best, but most will do fine with a less expensive brand.

Machines come with multiple programs to make different types of bread.  Most users will use only three types: standard (white) bread, whole wheat, and dough.  The dough setting is a great option, as the machine will do all of the hard work of making the dough, and all you have to do is form it for baking.  The dough setting is terrific for making pizza dough, rolls, coffee cakes, and braided breads, where you make the dough in the machine but bake it in your regular oven.

Most bread machines come with various programs to bake different types of bread, such as white and whole wheat. The controls may appear complicated, but they are very easy to learn, and in most cases, all you need to do is press a button.

Some additional program settings may be included such as sweet breads, and gluten-free bread. If your bread maker doesn’t have a particular specialty setting you can try using the standard white bread setting. Additionally, some machines allow you to create programs where you determine each step of the bread making process. This last option is for advanced users who develop their own recipes or who use unique bread flours that require unusual mixing, kneading, and backing times. Will you use the cake, yogurt, or jam settings that your machine may have?  Probably not, but that’s your choice.

Although many ingredients can be used to make bread, here are the basic ones and why they are necessary:

Flour – There are many types of flour, but for simplicity, let’s focus on white flour.  Most bread machine recipes instruct you to use bread flour, a flour with a 15% gluten content.  When your machine kneads dough, the gluten proteins are altered, becoming stretchy and more flexible.  This results in a delicious, chewy, and spongy bread.  All-purpose (AP) flour is a versatile flour suitable for a wide range of applications.  It typically has a gluten content of 12-13% so bread made with AP flour won’t be quite as chewy or structurally sound as bread made from bread flour.  In an ideal world, use bread flour for optimal results. You can simulate bread flour by adding a couple of tablespoons of Vital Wheat Gluten to AP flour to your bread ingredients, or just forgo the vital wheat gluten and still make a delicious breadmaker loaf using only AP flour. I often do that as I always have AP flour on hand. Lastly, cake flour contains only 7-9% gluten, as you don’t want a chewy cake; the low gluten content assures a tender result. 

AP flour is inexpensive. This bag will make five one-pound loaves of bread. I often use AP flour because it’s in my household stock.
Bread flour is also inexpensive, and it makes a better loaf. If you make bread regularly, consider buying and using bread flour.

Yeast-yeast is a living organism that feeds on the sugars and starches in bread dough and produces carbon dioxide gas, or CO2, as a byproduct.  It is the CO2 gas bubbles that cause bread to rise. The yeast is killed in the baking process. Yeast comes in various types.  Some bread machines use Active Dry Yeast, while others require Bread Machine Yeast, which is also called Instant Yeast. Instant Yeast granules are smaller and dissolve faster than the granules of Active Dry Yeast.

My bread machine uses Active Dry Yeast that I can buy in bulk at Costco. Each loaf uses only around ten cents’ worth of yeast.

Sugar-any form of sugar can be used, white sugar, brown sugar, honey, and molasses.  Small amounts of sugar are added to help jump-start the yeast’s growth. 

Any sugary product can be used for bead making, but most people have white sugar on hand. The recipe below uses around five cents of sugar.

Salt-salt adds flavor and also controls yeast growth.  Never mix salt with the yeast when you add your ingredients; put them in a separate spot in the machine’s bread pan.  

Water– is needed to bind all of the ingredients together.  Naturally, other liquids, such as milk, are sometimes used to achieve a different type of loaf.

Other ingredients-.Eggs, dried fruits, spices, cheese, meats, different types of flours, nuts, butter, cooking oil, powdered milk, you name it.  Each addition requires a slightly different recipe and may require different rising and baking times.  The good news is that others have already figured out all of this. If you have a new machine, read the manual/recipe booklet.  If you purchased a used breadmaker, download its manual, which will include recipes ranging from white bread to pizza dough, specifically created for your machine.

A simple and inexpensive white bread recipe.

*You must add ingredients into the baking pan in the order written. 

-1.5 cups warm water

-2 T cooking oil

-1 and 3/4 t salt

-4 cups or 500 gms bread flour (or AP flour)

-2 T sugar

-2 ÂĽ tsp bread maker yeast (I use regular Active Dry Yeast with good results)

I weigh my flour for better results. Five hundred grams is equivalent to 4 cups of flour.
Add ingredients in the order listed. I keep the salt and the yeast in separate spots, as salt can kill yeast if it is too concentrated.
Just press a button and the machine will mix and knead the dough in several cycles before baking it.
A perfect loaf!
Use a serrated bread knife when cutting soft breads. The knife on the top is a food service knife, and it wasn’t very expensive. Its slightly longer length works well to make short work out of making slices.
Nothing is quite as wonderful as fresh, warm, crusty homemade bread!

Use your bread maker’s “normal” or “white loaf” setting. Mine makes a great loaf of white bread in 3.5 hours. Total cost of the loaf, including electricity?  $0.78!

Allow the bread to cool at least 30 minutes before cutting.  A serrated knife works best. Any will do, but I like a knife that is a bit longer. It is not necessary to buy an expensive serrated knife, as they are no different from a less expensive one.  Serrated knives don’t cut the bread; they tear into it.  I have also used a standard Chef’s knife.  If it is sharp enough, it will slice bread. 

Remember, that homemade bread has no preservatives or other agents to keep it looking fresh.  If you don’t consume it in a couple of days, freeze it.  You can purchase inexpensive bread bags on Amazon, as well as other types of containers, to store unused bread. If we have any left after a meal, we usually use a large Ziploc-style bag, as we have those on hand.

Homemade bread machine bread is delicious and almost effortless to make. Having a homemade slice of bread with dinner elevates the experience, and a lunch sandwich made with homemade bread is superior to any packaged product.  If you see a machine at a thrift store, give it a try.  If you want to buy new, there are many machines available in the sub-$100 range.  Happy bread making!

Mike

Images are my own or screenshots used only for educational purposes.