Tag Archives: #Zojirushi bread maker

Save Money: Bake Your Own Multi-Grain Bread!

In a recent post, I discussed rediscovering my long-neglected bread maker. In reality, I have several bread makers, as you can buy used ones for very little. I love to compare gadgets.  That is just me.

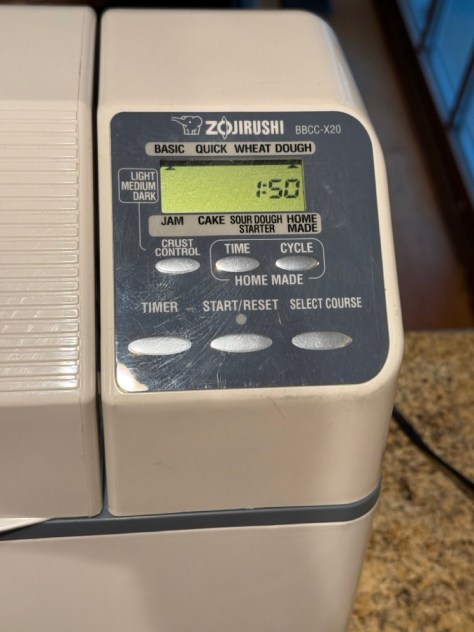
It was very inexpensive for me to make bakery-quality white bread using simple, readily available ingredients.  The bread was delicious, but my wife believes that white bread isn’t as healthy as other types of bread, and so I’ll try baking a multi-grain recipe.  Today I’ll be using a 20-year-old Zojirushi bread maker using the whole wheat setting.  It is very likely that the following recipe will work with any 2 pound bread maker that has a whole wheat cycle.

Don’t have a bread maker?  Shop second-hand stores or Facebook Marketplace.  You can buy bread makers for less than $10 at secondhand stores, and I have seen many in the $10-$30 range on Facebook Marketplace.  

Just a few bread makers that I saw on Facebook Marketplace.

The least expensive bread makers have a loaf pan that is more vertical than horizontal. The bread will taste the same; it just doesn’t look like a traditional loaf.  If you cut the bread perpendicular to the pan, you will get nice “sandwich-style” slices. Horizontal loaf pans make more traditional loaves, but the slices are pretty tall.  I’m using the Zojirushi today, because its two-paddle, long-pan design produces a horizontal loaf similar in size to the bread you buy in the store.  

If you buy any machine second-hand, make sure that the bread pan and paddle are included.  Plug the machine in and check to see if it powers up and the buttons work.  The majority of machines will work if they don’t look abused, come with a pan/paddle, and power up. I think you are best off with a machine that makes a 1.5- to 2-pound loaf.  However, one-pound machines will work too if you are a small family. Making a 2-pound recipe in a 1-pound machine will result in a mess, so make sure that you use a recipe sized for your machine. Often, you can download the instruction manual for your particular machine, which will include many recipes.

The loaf that I’m making today is from the Zojirushi instruction manual.  There are whole-wheat versions of multi-grain bread that can be found on the internet, but I thought I would start with a recommended recipe before attempting an internet recipe.  It makes a two-pound loaf.

This is the recipe that I used. Please make sure that you add the ingredients in the order listed for optimal results. This machine uses active dry yeast for regular cycles. However, some machines may require instant/bread-making yeast. Check your manual.

Like everything else, bread prices are rising steadily due to inflation and the Trump tariff taxes.  There are reports online of people spending $8 to $10 on a loaf of bread.  I’m in Chicago, and we are not that high as of November 2025.  However, multi-grain breads are still pretty pricey.  A Brownberry 24-ounce multi-grain bread is going for $4.99, and a half loaf of Lewis 12-ounce bread is $3.79 at my local store.

$4.99 for 24 ounces, and that is the sale price!
$3.79 for only 12 ounces of bread!

The multi-grain bread that I’m making today is 2 pounds, or 32 ounces.  I sourced the ingredients from Amazon, Costco, and my local market.  I did try to get good prices, but I would have saved significantly more if I had bought some ingredients, like the bread flour and 7-grain cereal, in bulk.  

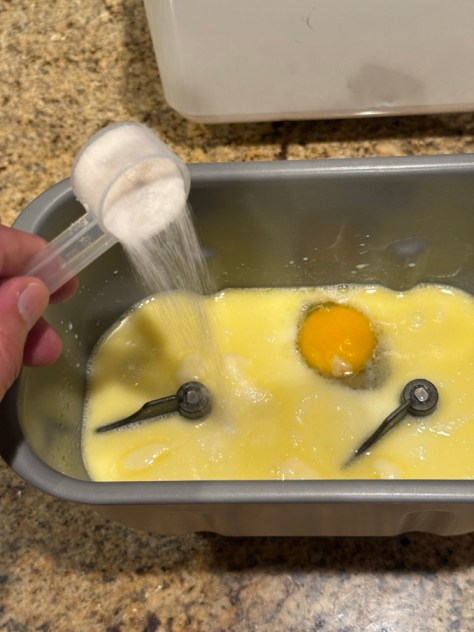
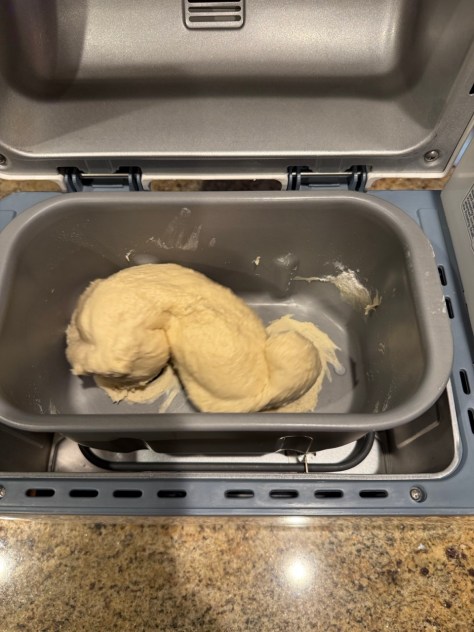
Making the bread was beyond simple and took me less than five minutes to put together.  A few button presses later, and the machine took care of the rest.  It truly is a set-it-and-forget-it operation.  I buy my active yeast in a two-pound bag from Costco.  It is very inexpensive when purchased this way.  I keep it in the freezer for future bakes.  The only addition that I made to the recipe was ½ teaspoon of diastatic malt.  I read reports noting that a tiny amount of this ingredient helps the bread rise.

The only addition that I added to the recipe was 1/2 teaspoon of diastatic malt, which helps with texture and rise.

Here is a cost breakdown based on price per ounce of bread:

-The 12-ounce Lewis bread costs: $3.79   Almost 3 x more than homemade

-The 24-ounce Brownberry bread costs: $4.99 (on sale!) Almost 2x more than homemade

-My 32-ounce bread maker bread cost was only $3.60

It is not only more accurate to weigh your ingredients, but it is also faster and involves less cleanup.
All it takes is a few clicks, and the machine does everything else. I had to run some errands, and the bread was done when I got home.
Bread machines mix, knead, proof, and bake bread automatically.
A few beeps lets you know that it is bread time!
A beautiful loaf. Let it cool until it is barely warm; otherwise, you will rip the bread apart.
A crispy crust and soft interior. What more could you want? How about that it is significantly less than store-bought!

You simply can’t beat the quality and cost of homemade bread made with a bread maker.  The varieties of bread that you can make are endless, and it is possible to buy a used machine for next to nothing.  Why not give it a try!

Peace

Mike

images are my own or screen captures of images on websites. All are used for educational purposes only.

Save Money, Make Homemade Yeasted Rolls

Most families have their own traditions, as does ours.  Their significance may or may not be recognizable to others, but they are still important.

One of our traditions centers around our birthday celebrations.  When someone in our family has a birthday they get to choose the dinner menu for their special day.  The rest of us work as a team to make that dinner for the celebrant.  Our labor is part of the gift that we give them.

Inflation, the Trump tariff taxes, and other factors have made beef prices skyrocket through the roof and now we think twice when considering hamburgers for dinner.  Steak has become a rare luxury item in our home, so it is no surprise that it is a frequently requested item for a birthday dinner.

We recently celebrated my daughter’s birthday.  This was her chosen menu:

Steak, salad, broccoli, real mashed potatoes, cut up strawberries, yeast rolls and Rainbow cake.  

What is Rainbow cake? When my kids were very young my wife had a major operation that left her bed bound for many weeks.  I took off time from work to not only take care of her, but also our small children, one who was still in diapers. I wanted things to be as normal as possible for our children, and I came up with activities that we could do ranging from going to the zoo to having picnics at our local park.  I did all of the cooking during that time and one day I came up with the idea of making a rainbow cake. I added a magical descriptions about the cake concerning the power of the rainbow, and the cake became a hit.  In fact, some of my kids request that I still make Rainbow cake for their birthdays to this very day.

My daughter enjoying a slice of Rainbow cake for her birthday.

All of the above is just background for the reason of this post, which is another writing to encourage you to save money by using a bread maker.

I  have done several posts showing how easy and inexpensive it is to make bakery quality bread using a bread maker.  Today, I’ll write about using the dough function to make other yeasted products.  In this case, dinner rolls.

I don’t think that I have made dinner rolls in over a decade, so don’t expect perfection.  The bread maker easily makes a perfect dough, but dinner rolls are still more work than pressing a button as you have to form them, and bake them in the oven.

I found a traditional recipe from an author named “Sally” that looked good, so I went with that.  Honestly, they turned out delicious.  They were exponentially better than commercial dinner rolls and significantly better than those from the grocery store bakery.  Rich, yet light, they had a slightly sweet and eggy flavor and were a dynamite addition to our birthday feast. For me, they were extremely nostalgic, as they reminded me of the wonderful rolls that my mom made so many years ago. 

I was too lazy to cost out this recipe, but I know that they these rolls are significantly less expensive than comparable ones purchased from a good bakery.  The level of work is a bit more than the “press and forget” bread from a bread maker.  But since the machine does all of the heavy lifting, it is a pleasure to make them.  

Consider giving this recipe a try, and you will elevate a simple dinner into something special. Let’s take a look at the recipe.

This recipe is for a traditional bake. To convert the recipe for a bread maker remember to add your liquid ingredients first, followed by the dry ingredients and the yeast last.

I measured the milk and added the butter to it. I microwaved the mixture for around 15 seconds until the milk was warm to touch but not hot.

Into the baking pan it went.

In went an egg and then the salt.

Next, I added the sugar.

I weighed the flour, as that is the most accurate way to measure it.

Lastly, in went the yeast.

I selected the basic dough course and pressed start.

This is an extra step, but do it if you have time. After the dough was kneading for 5-10 minutes I checked it. It was looking a bit slack. There was still dough that wasn’t incorporating into the dough ball. This can happen even with careful measuring for a variety of reasons ranging from humidity, to variations in the brand of flour, to the size of the egg. If I did nothing the dough would probably be OK, but fixing it is easy.

I added about one tablespoon of flour and waited about 30 seconds to see if I needed to add more. That one tablespoon was enough, all was good.

Now the machine was on its own. I would come back when it beeped that it was done making the dough.

Here is the dough all puffy and beautiful.

I placed the dough on a lightly floured surface and allowed it to rest for around 10 minutes. This makes it more “cooperative” with shaping.

The next step involved a pastry scraper. This is a very inexpensive gadget with many uses. If you don’t have one you can just use a knife.

The dough was divided into 12 pieces. You can use a scale to be precises, but I just eyeballed it.

The edges of each piece was pinched together, and then I rolled the dough in my hand to form a nice ball.

The dough balls were placed in a 9 x 13 pan that I had sprayed with some cooking spray. Yes, not professionally shaped, but good enough. Don’t let perfectionism prevent you from bread making!

I covered the pan and placed it in a draft-free location and allowed the buns to double in size. I think it took between 30-40 minutes (I lost track of time).

I then baked them at 350F (175C) for 20-25 minutes. My oven may vary from yours so keep an eye on your rolls.

The rolls were a hit at dinner. The amount of work was more than making a bread maker loaf, but it was still very easy. The biggest drawback was that I had to be around when the dough was rising and then baking. Neither was a big deal.

Happy Baking

Mike