

I went to make some toast this morning and discovered that we were out of bread. No problem, I’ll just make some. Now, you may be thinking that making bread from scratch would be an all morning operation, however, the whole process is only going to take me around five minutes actual work.
If you have seen some of my other posts you know that I’m a big fan of bread makers, and I have more than one. I usually find them at thrift shops and I have bought working bread makers for as little as $4.99.
Today, I’m going a bit upscale and using one of my Zojirushi bread makers. These are considered the best of the best, and they have a price tag to go along with their title. New versions of this bread maker sell for around $455, with the ceramic non-stick version commanding an eye watering $500! Used Zojirushi machines also are resold at a very high price, but I was fortunate to get a deal as my used machine has a dent. It doesn’t impact its performance, but it does impact its resale value. I paid $70 for this classic gadget.
If you want to enter the world of easy bread making you don’t have to spend that much. I have purchased a number of bread makers for less than $15 at thrift shops and they all make a nice loaf. Why do I have more than one bread maker? I’m just a chronic comparer who enjoys playing with different machines.
It takes me about 5 minutes to pull and measure the ingredients to make a loaf. I do check on the dough very early on in the mixing process too. However, everything else is automatic from mixing, to kneading, to baking. It is a super easy process.
Today’s recipe is from Betty Crocker. Naturally, I have modified it a bit, and you can see my changes in the photos below.

I have a couple bread maker cookbooks, but you can find hundreds of recipes for free just by searching the internet. The reason I like cookbooks by Betty Crocker and Better Homes and Gardens is they are well tested and it is likely that they will make a delicious loaf.
You may ask why I make my own bread? It is simple:
-What smells better than bread baking?
-I produce a premium loaf for next to nothing in cost.
-I can modify my loaf in many different ways.
-I can make other types of bread, like hamburger buns, hotdog buns, or pizza dough that are significantly better than the store-bought stuff.
-Beyond regular white bread I can easily make whole wheat, rye, cheese bread, Sally Lunn, herb bread, dill bread, raisin bread, and many many other types of bread.
Let’s take a look at the recipe:

Here is the simple recipe. On the left are the ingredients for a 1.5 pound loaf, and on the right are the ingredients for a 2 pound loaf. I’ll be making a 1.5 pound loaf today which resembles a typical loaf. The two pound loaf would be much taller. Excuse my sloppy numbers, they indicate the ingredients in grams. It is much easier and faster to weigh ingredients, and it is more accurate too. You can buy a food scale for less than $10 and it will useful for many other recipes and kitchen tasks.

Here is the baking pan minus the kneading paddles. I like to spray a little cooking spray on the shafts, as it can be hard to remove the paddles if you don’t do this. This particular machine has two paddles, but most others have just one and they work well too.

I added the softened butter and I’m starting to pour in the water. I’m doing this by weight, adding 236 grams of water. Our water is heavily chlorinated, which slows down the yeast, so I’m using the filtered water from the fridge which I then warm to a “baby bottle” temperature in the microwave. Too hot, and you will kill the yeast. Too cold, and the yeast wont grow fast enough.
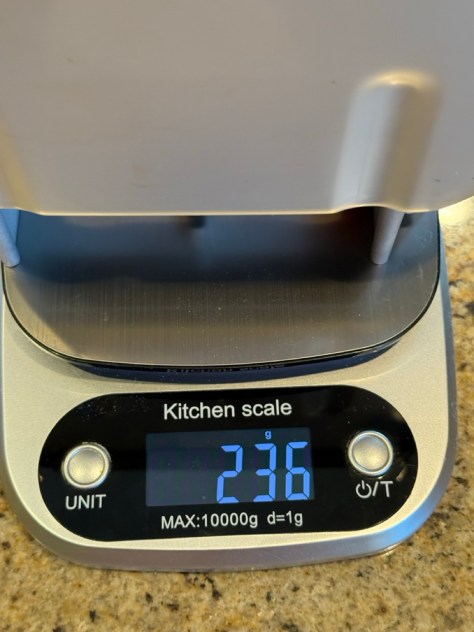
You can see that I got the water measurement just right. However, when dealing with weights over 50 grams a few grams one way or the other won’t make much of a difference.

After I measure each ingredient I hit the “T” button which tares the scale back to zero making measuring the next ingredient easy.

Next, I add the flour. I need 360 grams. It looks like a half of a spoon more will do. I keep this spoon in my flour canister. By the way, I’m using bread flour which has a bit more gluten than standard AP flour. You can buy bread flour inexpensively at Costco, and also on Amazon. Naturally, most grocers also sell it, but it will cost you a bit more. A 5-pound sack has around 21 cups of flour. Since this recipe uses 3 cups of flour a sack could make up to 7 loaves.

This recipe calls for 3 tablespoons of powdered milk. I measured this by weight. Many products give a weight measurement on the Nutritional Facts panel. In this case 1/4 cup is 23 grams in weight. Three tablespoons is 3/4 of this amount, so 23 grams x 0.75 is between 17 and 18 grams. I’ll use 18 grams of powdered milk for this recipe. You can also find volume to weight conversions on the internet. They are usually in grams, making measuring even easier. Most food scales can be switched between Imperial units (pounds/ounces) and metric units (kilograms/grams). In goes the powdered milk.

When it comes to the salt and the yeast I use standard measuring spoons. They weigh very little and I don’t think my scale is super accurate with tiny amounts. Always level off your measuring spoons for the best results.

I buy yeast in a block as it is much less expensive than those little envelopes. I always keep my yeast in the freezer. Doing so it will stay active for a very long time. I started to use this batch of yeast almost a year ago and it is still good.

I’m going add some of my own extras to this recipe. I’m adding around 2 tablespoons (roughly) of ground flax seeds. The fax seeds add fiber, Omega 3 FAs, and antioxidants, plus they add a nice flavor and a homey look.

I’m also adding 1 tablespoon of instant potatoes (dry). The flakes hold onto water and will keep my bread fresher a bit longer. Remember, this bread has no preservatives. It will dry out much quicker than a commercial loaf. If you eat just a little at a time, freeze the remainder. I keep mine in a breadbox and it is good for up to three days, and toastable for a day or two after that. Note that I keep the salt and yeast in separate corners of the pan. Salt can kill yeast if too concentrated.

The pan goes into the machine, I press a button or two, and I’m almost done. Total time to measure the ingredients? Around five minutes.

There is one more important thing to do. I use a spatula to knock down any errant flour off the sides of the pan. After the dough has been mixing for a few minutes I check to see that it has formed a slightly sticky (to touch) ball. If it looks too dry and raggy I’ll add water one tablespoon at a time until it looks like the above. If it is too loose/wet and not forming a proper ball I’ll add flour one tablespoon at a time until it looks right. This is an important step. If you weigh your ingredients you will make no adjustment or only minor adjustments.

I walked away and did some other tasks. After a few hours I started to smell the delicious aroma of bread baking. A bit over 3 hours from the start and I had this wonderful loaf. Bread for pennies? Even more important now that inflation is out-of-control.
Making bread is a fun hobby, and I have been baking bread for at least 40 years. I have used a food processor, a mixer, and bread makers. All have their advantages and disadvantages. However, when it comes to simplicity and ease you can’t beat a bread maker. We will be enjoying this loaf for the next few days. When it is used up I’ll simply make another one. And, yes, it tastes so much better than that stuff that is wrapped in plastic at the grocery.
Peace
Mike